.post-body img { margin-left: -40px;}
Showing posts with label In the Kitchen. Show all posts

Monday, April 11, 2016

Healthy Snacking


 So the other day I was making up this tasty treat, and just getting ready to dig in when, all of a sudden, I thought,
   "Wait! I need to write a blog post!"
 I quickly ran then to get my camera to snap some pictures before I helped myself to this yummy snack.


 Lately I've been really interested in coming up with healthy snaking ideas. Well, trying to eat healthier overall, but snacking is particularly important to me because, well, I like to snack. So I've been trying things like cottage cheese, fruit, and smoothies, which I was already doing, and I've discovered that I really love cottage cheese. But when it comes to fruit, I'm not too excited. I'm just not a fruit loving person, and there are so few it seems that I actually like. Apples I like well enough, but I like them much better with peanut butter(unless they're straight from the orchard, then I could eat them any way, any time).


 I actually saw this idea on Pinterest quite a while back, and as I was looking for some kind of snack it came to my mind. And I want to tell you that whether I eat my apples with all the toppings or not, I am always going to cut my apples this way! In my opinion it is sooo much easier!


 You can put whatever you want on these handy little apple slices, but I would suggest starting with natural peanut butter. I used to think, "Whatever, natural or unnatural. Doesn't matter." But it does. It tastes waaay better! Plus it's much more yummy and gooey from all the natural oil.


 Just in case you're wondering, I cut the core out of this slice with a tiny heart shaped cookie cutter. So that's another fun little thing you can do with these if you'd like. :)

 In the pantry I found some cinnamon granola that Laryssa had made(it also had cranberries but I skipped out on those), so I sprinkled some of that on each dripping apple slice. When I first made these we didn't have any chocolate chips at home(much to my despair) but they were still very good.

The next time I got to have my chocolate chips, making it even better!


 And you can't deny that these just look so pretty! So tell me what you think, as well as ideas for more toppings, and even other healthy snacking ideas!

 Katlynn

Wednesday, September 30, 2015

Iron Skillet Corn Bread


My Discovery of Cast-Iron Skillet Potential


 I was told that food sticks to cast-iron skillets...badly.


 Did a google search: "how to use cast-iron skillets?"


 Found that they need to be properly seasoned with oil.


 Did that; followed instructions.


 Started cooking with the cast-iron skillet...


...nothing stuck... 


Became a cast-iron skillet fanatic.


Will now be using it for EVERYTHING!! 

~


Including cornbread! I've seen pictures of it baked in cast-iron skillets and loved how rustic it looked! The dark background of the skillet really makes the rich, yellow cornbread pop! Cast-iron skillets make basically any dish so much more vivid and presentable.


 So I had to try it myself.

 Now I know how I'll be making cornbread from now on...

 ...and how often. =)


Saturday, September 26, 2015

Ginger Sweet Potato Bean Soup & Ginger-Roasted Pumpkin Seeds


 The first day of autumn this year brought with it the inspiration of cooking "fall" foods. Cinnamon, ginger, nutmeg, cloves, is what comes to my mind. I didn't want to just make the boring old pumpkin pie, apple pie, and so on, even though they are really good. But I wanted to try something different. Something that actually wasn't a dessert.


  So what could be more appropriate than soup, on a breezy, autumn day. Ginger soup at that. I was trying to think of fall-like ingredients. There was a bag of yams laying around, so that was definitely a winner. I also had a lot of prepared white beans that I had soaked and rinsed, soaked and rinsed, soaked and rinsed, over the course of several days (I know that sounds excessive). So my end conclusion: Ginger Sweet Potato Bean Soup!


 Unfortunately, we didn't have any homemade bread on the day I made the soup, so I needed a side dish. We had some raw pumpkin seeds in the cupboard that I needed to roast at some point anyway. Thinking that the soup and seeds might as well "match," I sprinkled some ginger on them along with salt, pepper, and melted butter. The taste is fantastic, even with the unfortunate twinge of burnt taste (I don't know if it's because of the pan, the oven, or just my lack of skill, but I still manage to burn things fairly often).


 Anyway, by the time the soup was ready for dinner, I wasn't even hungry. The pumpkin seeds were just too good. =)


 Ginger Sweet Potato Bean Soup

olive oil

ground ginger

ground cloves

onions, chopped

garlic, minced

carrots, diced

chicken broth

yams

white beans

spinach

salt

pepper

Ginger-Roasted Pumpkin Seeds

raw pumpkin seeds

ginger

salt

pepper

butter, melted

Bake at 350 on a cookie sheet for 10-15 minutes. 


Sunday, September 13, 2015

Salad in a Jar


 Going to fairs and flea markets can be fun, and is something my family does at least once or twice a year. Nonetheless, I almost always go away with my stomach telling me I really shouldn't have eaten all that greasy, fried food. I'm sure you've all been there before. The steak sandwich and funnel cake sound great (although honestly, these don't even appeal to me anymore), and since there's not a whole lot of options that don't involve deep-fried, nutrition-starving fare, you go ahead and indulge.

 But gee, just imagine what a little bit of planning and smart thinking can achieve(and how much happier your stomach could be on the way home=). Who says you can't pack a lunch to the fair (or anywhere)? For that matter, who says you can't pack a yummy, nutrition-loaded salad?

 No one! Yeah, you might look a little funny eating salad at the fair, but it's worth it.

 I'm sure you've seen the salad jar buzz on Pinterest by now. I obviously have, and am glad I did. I love the idea of being able to make up a fresh salad ahead of time, and taking it anywhere I go.

 It's also a great way to use leftovers in the fridge! Here are some ideas to get you started:

-leftover corn or peas
-beans (of any kind)
-cooked pasta
-chopped veggies(of course)
-chicken or any meat
-walnuts, cashews, pecans, peanuts(my personal favorite)
 -oranges, strawberries, grapes(gotta love fruit)!

 All that's needed to assemble the salad is to:

1) Pour salad dressing on the bottom.

2) Add tender veggies like tomatoes and onions.

3) Add crisper veggies like broccoli and carrots.

4)Add any type of protein (cheese, meat, legumes).

5) Add any kind of leafy greens(really pack them in...you can fit a lot)!

 One of the reasons I love making salads is because it's so easy to make it look amazingly irresistible. Using bright, vibrant, and fresh vegetables and fruit in a salad make it almost effortlessly beautiful!

 So next time you make a trip to the fair or flea market, think ahead, pack a lunch, and enjoy the simple, healthy taste of homemade.


Monday, May 4, 2015

Beef and Rice Enchiladas


Like I said before, I LOVE Mexican food. So today I'm sharing an enchilada recipe. My favorite recipe so far has been with chicken(oh it's simply heavenly), but when my mom asked me to make dinner last week, we didn't have any chicken, so I made this beef and rice enchilada recipe instead.

This was the first enchilada recipe I ever made, and I fondly remember making it for the first time with my older brother. Such sweet memories. :) Except when we made it we didn't know any better to cook the rice first. Haha!

Here are the ingredients:

1 pound ground round
1 medium onion, chopped
1/2 cup chopped green bell pepper
1 tablespoon minced garlic
1 can(6 oz.) tomato paste
3/4 cup water
1 cup cooked white rice
3 cups shredded cheddar cheese (divided)
1 1/2 teaspoons dried oregano
1/2 teaspoon dried thyme
1/2 teaspoon fennel seed
1 teaspoon garlic salt
1 tablespoon chili powder
12 flour tortillas (about 10 inches) warmed
8 ounces picante sauce or salsa
1 can (about 10 oz.) enchilada sauce.


The first step is to cook the beef, along with the peppers, onions, and the minced garlic. As you may have noticed, my meat here isn't beef. It's actually venison, which we've had since last deer season, but it doesn't make a big difference.


While the meat is cooking, you can go ahead and prepare your rice, which is going to be the next thing added to the skillet, along with all of these awesome ingredients.


After the meat is cooked and drained, add the picante sauce or salsa(I used salsa), tomato paste, garlic salt, fennel seed, oregano, thyme, chili powder, water, rice, and 2 cups of cheese(Yeah, don't go by the picture. I only have one cup of cheese sitting there). :)


Once all of the necessary ingredients are added to the skillet, cook it over low heat until it thickens (about ten minutes according to the recipe).

Doesn't it look sooooo good! This is when you get that amazing smell of the Mexican food we love!

Sooo Good!


Now, to actually make the enchiladas. First you need to pour some enchilada sauce into your baking dish. It doesn't need to be a lot, and you're going to put more on top of the enchiladas then, which will pour down into the pan anyway. Still, make sure it is well covered.


For tortillas I just bought really big ones(burrito size) and they actually turned out pretty well. And I might add that I still had more enchiladas than the recipe said it would make. You can use smaller ones, but I imagine the smaller they are the harder they will be to wrap up and keep together.

For filling the enchiladas, if you need a reference, the recipe says 1/2 cup of beef mixture for a 10 inch tortilla. But it really isn't too hard to figure it out yourself, especially since you may use different sized tortillas.


 Roll it up tight and carefully place in the pan with the seam down.


Pour the rest of the enchilada sauce over the enchiladas. I was kind of running out of sauce for mine. :(  Note: Make sure you have plenty of sauce.

 And then....


Put all the rest of the cheese on top!! Oooh yummy yum! But if I were you, I wouldn't go with the recipe on this one(1 cup of cheese). Just put on all the cheese you want!! :)

Set the oven for 350 degrees, and put the enchiladas in for 8-10 minutes(or until heated through and cheese melts).

And Tada!


You can now serve your family a delicious, Mexican meal that will be sure to please! :)

I ended up with a total of fifteen enchildas(I might have used more than a pound of meat; the bag didn't say how much it weighed.) So we had some leftovers, which is totally fine with me cause these still taste awesome when reheated.

 As a little extra for you, I also cooked up some refried beans for this meal. No I didn't actually make the refried beans. But I did cook them differently.


We usually just put them in a big bowl and then add cheese later, but this time I put the beans in a baking dish, topped with lots of cheese, and baked it in the oven for a while. Maybe you all have figured this out already, but it was so much easier than heating and reheating in the microwave. Plus, I could put on a lot more cheese and actually have it melt.

So, I hope you will enjoy this recipe as much as my family has, and keep coming back for more!


Tuesday, March 10, 2015

Homemade Hamburger Buns


 Lunch meat sandwiches are a staple at the Shingler household. So as you could guess, we buy hamburger buns almost every week. And, as you might also guess, I've been wanting to try my hand at making them. One less item to buy, one more to make.
 At first, I thought it would be time consuming. I won't lie to you. It did take some time. I'm discovering that all things "bready" do take time. Of course, the more effort you put into a food, the better it tastes. Anyway, it didn't actually take as much time as I originally thought. There's basically three main steps:

1) Make the dough, knead it, and let it rise.
2) Shape the dough into 16 round rolls (this is easier than it sounds) and let them rise again.
3) Bake the buns for 15 minutes and enjoy an extra-scrumptious sandwich!

 Once you get past the realization that bread needs to be kneaded and given time to rise, you'll be like me and want to bake every kind of doughy thing that exists!

                    Homemade Hamburger Buns   (adapted from the kitchn)

 Ingredients 

 1 Tbsp. active-dry yeast

 1 c. warm water

 1 c. milk

 2 eggs

 4 Tbsp. vegetable oil

 4 Tbsp. sugar

 2 tsp. salt

 6 c. flour

 2 Tbsp. butter

 Instructions

 1. Dissolve yeast in warm water.

 2. Meanwhile, whisk milk, eggs, oil, sugar, and salt in a separate bowl.

 3. Add to yeast mixture.

 4. Gradually add flour until combined.

 5. Knead dough and let rise.

 6. Divide dough into 16 round rolls and let rise again.

 7. Melt butter and brush on to risen buns.

 8. Bake at 375 degrees for 15-18 minutes or until golden brown.  

 Notes

 I actually used more flour than what the recipe actually called for because it was hard to knead. My buns turned out just fine, so I would say to use the flour you need to get the consistency that seems right to you. Just be hesitant to add way too much. Small amounts at a time are good.

 Believe it or not, I actually forgot to use the butter (silly me). I would suggest using it though, in order to keep the crust soft.

 Also, when it comes to giving these hamburger buns their wonderfully rounded shape, simple technique is the trick. Just take the sectioned-off piece of dough and roll in a tight circle against the counter or table with the palm of your hand. After a few circles, you'll have a perfect little sphere!

  I was so delighted with the outcome of this recipe! Couldn't have been happier. Won't you give it a try?


Tuesday, March 3, 2015

Peach Orange Smoothie


Okay, there's consistent freezing temperatures, snow and ice on the ground, and probably quite a few more weeks of winter left, and I'm inside making smoothies! Maybe it has to do with my impatience for the final arriving of summer and warm weather. Whatever it is, I have a sudden appetite for a tall glass of icy, fruity nourishment (no matter how cold it makes my hands). I love making smoothies because they're so easy to experiment with and they make a really quick and healthy snack. All it takes is some fresh fruit, milk or juice, ice cubes, sweetener (I like to use honey mostly), and maybe some yogurt. Toss it all in a blender and puree until nice and smooth!
 If you're like me and can't wait for warm weather and cool drinks, it's nice to have some frozen peaches left over, so you can make this smoothie before warmer weather. All the rest of the fruits in this smoothie are mainly non-summer fruits (since I made it in the middle of winter). So grab all your yummy ingredients(and a sweater and slippers!), and join me in my chilly kitchen to make an icy-cold, Peach Orange smoothie!

 Peach Orange Smoothie

Ingredients

1 1/4 c. frozen peaches

1 small orange or tangarine

1/4 c. milk

1/4 c. greek yogurt (vanilla or strawberry)

4 ice cubes

1 tsp. honey

Place all ingredients in a blender and pulse until smooth. Enjoy!


Thursday, February 19, 2015

Chicken Fajita Quesadillas


As you all may have noticed from reading our blog, Laryssa is the cook.

 However, despite appearances, I can cook(not that good), and I will cook(occasionally). And when I do it is 99% of the time to make something Mexican. In fact, through the last several months the only cooking/baking I have done is two Mexican based meals, and a batch of oatmeal muffins! So recently my mom suggested that I try making meals for the family more often, with an added comment that I should make something that wasn't foreign for once. :) Nevertheless, my family loves Mexican food, and I usually don't hear any complaints when I say I'm going to make enchiladas again.

 That's what I normally make, enchiladas, but last Saturday I tried something new. A recipe for chicken fajita quesadillas! Okay, so it's not what you would call authentic Mexican by any means, but Tex Mex tastes just as good to me. I found this recipe, Chicken Fajita Quesadillas, on Pinterest and couldn't resist the look of those tasty, cheesy wonders. And following my usual style, I didn't bother with directions too much. I just got the basic idea and used my own spices, and now I'll share it with you.

You will need:

1. Boneless chicken breasts

2. Bell Peppers(variations of colors are nice)

3. Onion

4. Cheese

5. Chili Powder, Paprika, Garlic Powder(Cumin also would be good, I just didn't have any at the time)

6. Oil

7. Flour tortillas

First thing you want to do is cut up your chicken and peppers and onions. You don't want your chicken to be thick, so I sliced the chicken breasts in half(see this website here http://www.simplyrecipes.com/recipes/chicken_fajitas/). When I did mine, I cut it into strips and then cut those into smaller pieces. But looking back, I think it would have been best if I had cut the chicken more fine or in much smaller pieces.


Next, put some oil in the skillet to fry the chicken. The recipe I was going off of called for fajita seasoning mix, which I didn't have and wouldn't bother buying in the first place. So I looked up fajita seasonings online. I came up with Chili Powder, Paprika, Garlic Powder, Cumin, and a few other things, but I decided to just go with the first three. So add a generous amount of your choice of seasonings(the fun part!).


Yummy!

Then once the chicken is done you can replace it with the peppers and onions. They will pick up some of the seasonings leftover in the skillet from the chicken, but go ahead and add some more anyway. This will bring out the flavor even more! And oh, the heavenly aroma!


Alright then. Once your chicken and vegetables are all finished, it's time to make the quesadillas!
 Place a tortilla in the skillet with oil, then cover it with the chicken, peppers and onions, and cheese.


Then place another tortilla on top and when the bottom tortilla is browned, flip the whole thing over to fry the other side.


 Now you will see in these pictures that I used a whole tortilla. I would suggest that you NOT do it this way. It is a headache you want to avoid. The tortilla was so heavy and I didn't have a spatula big enough to pick up the whole thing. So when I tried to flip it, some of the filling fell out and the tortilla was fragile, and oh what a mess! Here's what I suggest: Cut your tortilla in half before frying, place both halves in the skillet and top the one with the chicken and etc. Then when it's done frying, flip the one onto the other and take off of the skillet. That way, you don't even have to flip the entire quesadilla. I tried it this way and believe me, it works much better. :)


After removing your quesadilla from the skillet, cut it into four triangles(or two if you already cut the tortilla in half to fry), and enjoy!


Tuesday, February 17, 2015

Granola Bar Gifts


 In my last post about making bread, I said that small steps to a "homemade kitchen" simply thrills me. Well, I've found yet another homemade recipe to replace a store-bought item that we often buy...granola bars. Katlynn especially enjoys granola bars for a snack, so since they can be so expensive (even with coupons), I decided I'd try making them myself. There's probably a million recipes out there for granola bars, but I stumbled upon this one while searching online and it's served my purpose quite well. The ingredients list is actually rather small which makes this recipe extremely easy and fast to make. This also makes a quick gift to wrap up for any special occasion (it just happened to be Valentine's Day when I made these).
 The recipe calls for any kind of Bisquick mix, meaning if you have a homemade recipe on hand, your in luck! Of course if you have actual Bisquick, that would work too. But the frugal way to go would be to make your own, which is also very easy and doesn't take long at all (I'll include the recipe I've been using for a while now).
 Also, I like this recipe because it gives room for flexibility when it comes to what kind of granola bar you want to make. In fact, there are even a few suggestions listed at the bottom of the recipe.


Homemade Chewy Granola Bars   GroceryBudget101.com

1 1/2 c. Bisquick*

1 1/2 c. quick-cooking oats

1 c. brown sugar

1/2 c. butter or margarine, softened

1 egg

1/3 c. chocolate chips (optional)

Instructions

1. Heat oven to 350 degrees.

2. Combine all ingredients and mix well.

3. Spread batter in un-greased, 13x9 pan and press firmly

4. Bake 15-17 minutes (cut into bars while still warm)

Variations

Add any of the following instead of or in addition to chocolate chips.

1/3 c. chopped dried apples and 1 tsp. cinnamon

1/3 c. powered milk (for a breakfast bar)

1/3 c. raisins, craisins, or dried cherries

1/3 c. chopped walnuts or almonds

*Homemade Baking Mix (from The Amish Cook's Family Favorite Recipes)

9 c. flour

1/3 c. baking powder

1 Tbsp. salt

2 tsp. cream of tartar

1/4 c. sugar

1 c. dry milk

2 c. shortening

1. Sift all ingredients together except shortening

2. Cut in the shortening

3. Use as Bisquick mix!


Gift Wrapping!

Granola Bars can be a really neat and unique gift idea for Valentine's Day or any other holiday or special occasion. To wrap them individually, I used a rectangular piece of foil. It was kind of like wrapping a miniature gift! Then I used some ribbon to tie bows around each one. You can then place however many individually wrapped granola bars into a container (I used a tin box), dress it up (I used ribbons), and label with customizable, printable labels (like the ones I found here)!


Monday, February 9, 2015

How to make Homemade Bread from Scratch


My ultimate dream home would be one in which all the meals and all the ingredients for the meals would be homemade or homegrown. Obviously this wouldn't just happen overnight, but it excites me when we make one small step towards that end.
 One of those steps for me is when I find a good recipe for a certain food that we'd normally buy from the store, and then replace the store-bought product for the homemade. Probably the most beneficial and thrilling achievement I've made in this area is making homemade bread versus buying it from the store every week. Not that bread is the most expensive grocery item that we buy, but at our house, a loaf of bread sure goes fast...that and milk. So now all we need is a cow. =) But anyway, making bread is really quite fun once you get the hang of it. For me, it's just become part of the weekly routine. We have a family of six, so two homemade loaves usually last us two days. So I'm now baking bread every other day, which isn't entirely necessary I suppose, assuming I could make more in one day and then freeze some. But I've really come to enjoy baking bread. Like I said, it's just become a part of the routine, and routine makes me happy. Not only that, but when I make bread more often, we have fresher bread more often as well. And that, I believe, makes everyone happy. =)
 So, let's get down to business, shall we?

Homemade White Bread (from the kitchn)

1 c. water, lukewarm
2 tsp. yeast, active-dry

2 Tbsp. butter, unsalted
1 c. milk
2 Tbsp. sugar
1 Tbsp. salt

5 1/2 c. flour

1. Pour the water in a mixing bowl and sprinkle yeast over the top to dissolve.


The water shouldn't be dish-water hot or it'll kill the yeast. But it shouldn't be too cool either. Shoot for lukewarm water. Once you make this several times, you'll eventually get a feel for the right temperature.
 In order to proof the yeast (make sure that it's living), I usually sprinkle about 1/2 Tbsp. of the sugar over top as well. You can mix the yeast and sugar into the water if you want, but usually I get yeast stuck on the spoon this way, so I prefer to just let it sink to the bottom. The yeast will then feed on the sugar, causing it to foam up. Oh and, make sure you watch it foam... it's really awesome! I've been making bread for almost a year now and I still like watching the yeast gradually sprout up to the top.

2. As the yeast is dissolving, melt the butter in a small bowl. Add heated milk, sugar, and salt; stir. Then pour the milk and butter mixture into the yeast water.


Make sure that you make a mental note to heat the milk in the microwave. If you don't, you'll end up with a messy counter top and a broken bowl (like I unfortunately had, one baking day)! Hot, melted butter and icy cold milk do not mix!

3. Now add one cup of flour and stir.

 It will be lumpy like this, but no worries.

4. Keep adding flour and stirring until dough forms into a ball. Then dump it onto a floury surface.


 If you're like me and try to scrape every last scrap of dough off the bowl and spoon, you'll spend more time making bread than you really want to. Try to ignore the inclination, get most of the dough out, and then move on. Nitpickiness won't serve you well here, especially if you plan to make bread weekly.
 At this point, I usually let the bowl soak in water since I'll need it to be clean for later, after I'm done kneading. That way the dough doesn't harden on the bowl and so it's easier to wash.

5. Knead dough for 8-10 minutes, adding flour as needed.


Once again, this is something that you'll just get the feel for eventually. At first, the dough will stick to your hands, but it's perfectly fine. You can add good amounts of flour until it's less sticky. Nonetheless, after you've been kneading for a while, be cautious of adding too much flour. If it's still sticking to your hands, just add small amounts at a time (I just grab a little flour with the tips of my fingers).
 As for kneading, the pictures above should hopefully help illustrate how it's done. Basically, it's a 3 step process. First, stretch the dough out with one hand. Make sure you are actually stretching the dough, not just flattening it. Remember, what you're actually doing here is trying to stretch the yeast strands so they're good and strong. Secondly, fold the dough in half. And thirdly, turn the dough so that the fold is facing right or left. Then, repeat the steps until you've got a nice, strong mound of dough.
 Kneading is just about the best part of making bread, and is one of the reasons I don't use a bread-machine. There's something about kneading that I find appealing. Maybe it's the steady rhythm or the feeling of the dough against my hands, or maybe it's the process of stretching the yeast until it's good and strong. At any rate, it might get tiring or even frustrating at first. But there comes a point where you know how much flour to add or when you know you've kneaded it enough. When the dough is ready to rise, it'll be elastic and will sit in a tight ball without drooping. Or, you can use my favorite method, the window pane test. Simply pinch off a golf-size piece of dough, roll it into a ball, and then slowly stretch it with the tips of your fingers and hold it up to the window. If the dough doesn't tear and if it's transparent enough so the light shines through it, then your ready for the next step!


6. Place the dough in a clean bowl (the one you've soaked in water, if you wish) and cover with either plastic wrap or a damp kitchen towel.


 In the cold, winter months, fresh-out-of-the-oven bread is amazing! But trying to find a warm environment for your dough to rise can be challenging. I've used several different methods but I've found this one to work the best. Place the covered-dough on a baking tray and then fill the tray with the hottest water you can get from your kitchen faucet. Place it in the oven and then lay a towel over the bowl and the tray so that the heat from the water is contained. Close the oven door and wait for the dough to rise!


7. Once the dough has doubled in size, punch it down and separate the dough into 2 parts. Then place them on the counter to rest for 10 minutes. Meanwhile, grease 2 bread pans (shortening and a dusting of flour works best). Form each ball into a loaf (here's a helpful video on how to form a sandwich loaf), place them in the pans, cover, and let them rise a second time (you can use the same rising method).


 8. Once the dough has risen over the top of the pans, preheat the oven to 425 degrees. As soon as the dough is in the oven, reduce the temperature to 375 degrees and bake the bread for 30-35 minutes. Bread will generally be darker on the top than on the sides when done.


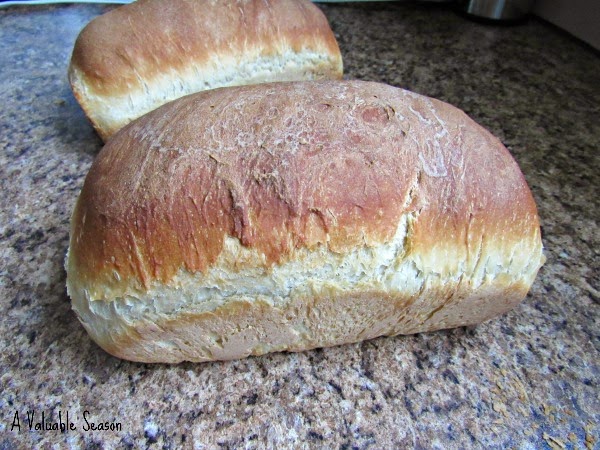
Open the oven to find two golden-brown loaves of pure goodness! 


I know it's tempting to dive right in, but cutting the loaves before they've cooled prevents the crust from softening. You'll notice that the crust is really hard when you first take them from the oven, but once they've cooled, the crust gets nice and soft. I'm not a fan of tough crust, so I normally like to let them cool first. Nonetheless, fresh warm bread is awfully hard to resist, so we sometimes wait at least 10 minutes and then treat ourselves to a hot loaf.

 When I first started making bread, the best advice I found was to choose a recipe and stay with it. If it didn't turn out the first time, don't keep trying new recipes until you get it right. But rather choose one recipe and try, try again until you've mastered it. I've been using this recipe ever since I started making bread last spring and it turns out better and better the more I practice and take note of what I did differently. I like this recipe, particularly because the measurements are so easy to remember. So after a while, I didn't need to keep referring back to the recipe. If you can then, it's very helpful to try to memorize the measurements.

 I hope you found this helpful and that you'll come back for some more delicious homemade bread recipes. Wish you the best in your bread-making adventures! Happy baking!