.post-body img { margin-left: -40px;}

Friday, May 29, 2015

Breakfast Fruit: 3 Easy Steps to Help your Family Love Fruit


 Morning is the best time of the day for me. And breakfast is the very best meal. So why don't I put more effort and time and thought into it, like I do for dinner? This is what I started asking myself after reading a post on meal planning (at this really awesome blog, Live Simply ). I mean, what could be better than waking up to a freshly prepared breakfast each lovely morning? Well, yeah, I'm the one that wakes up to prepare breakfast each morning. But I'm loving it. 

 In fact, you might say I'm getting a little too fond of breakfast preparation. I'm beginning to think the kitchen is all mine in the morning. That's always been an issue with me, actually. The kitchen needn't have anyone in it but me, while meal prep is happening. There's something a bit unnerving about having someone standing around and watching you during all that cutting and peeling, with juicy pulp and egg shells scattered across the counter (okay, I'm not always this messy, believe me), and with me running here and there throughout the kitchen for this, that, and the other. Anyway, all that to say, I like my privacy in the kitchen (and would love to have an actual dining room!) But all are more than welcome after everything is on the table and the counter is tidy and clean. =) 

 So, what's with the trays of fruit?

 Okay, I am what you may call a "fruitaholic." Fruit is my dessert. It's sweet, juicy, oh, so colorful, and wonderfully assorted. Now, there are certain members of the family who will eat it, but not extremely often and certainly not every day. So, would you believe me if I told you that I get bags stuffed full of all kinds of fruit, and that it barely lasts through the week?! I wouldn't have believed it myself. 

 But, after experimenting, I've acquired a few tricks to share with you, that will get your family eating much more fruit, much more often. Ready?


 1) Prepare, prepare, prepare. If no one is crazy about fruit, there's no way that they're going to bother washing the berries, peeling the oranges, cutting the pineapple, chopping the cantaloupe, or slicing the kiwi. It's just not going to happen. 

 So here is the second part of the secret.

 2) Make it look irresistible. Mixing and matching them and displaying them so the fruit actually looks appealing, is the best and easiest way to empty your fruit bowl, sitting lonely and neglected in the corner of your kitchen. If possible, use glassware to display your delectable gems. It does wonders to enhance their appearance. Also, choose a variety of colors. Don't put strawberries, grapefruit, and raspberries all on one tray. Rather, choose colors that will compliment each other. Believe me, it's an art.

 3) Mix it up. Make sure not to bore everyone with bananas and oranges every morning. Be creative. Try new things. One morning, we didn't have anything but watermelon, cantaloupe, and bananas. Normally, we wouldn't think of having melons for breakfast, but that's what we had. So I went right ahead and placed them on the tray alongside the bananas. And that was our breakfast tray for the morning. Hey, it works.


  If anyone tells you that fruit is boring, don't believe them. Fruit is fun, delicious, healthy, and full of  of potential.

 Is your family reluctant to eat fruit in the morning? Take a trip to the farmer's market, find some fresh, seasonal fruit, and prepare it, pretty it up, and mix and match. Next thing you know, the fruit will be gone before the pancakes! 


Monday, May 25, 2015

A Lovely White Bracelet


 I've been working on my jewelry lately, attempting to make new bracelets using different techniques. I'm especially interested in using different cording like suede and leather to make the more rustic, country kind of style I'm fond of. But since I'm not posting any of that right now you know I haven't had much success with it. I'm working on a bracelet right now that I finally put together, but then realized it was too big.


  However, I have had success with this lovely bracelet. I wasn't even planning this one, it just happened. I was looking around at Michaels, mostly in the jewelry section, and found a pack of metal connectors on sale. Yippee! So I bought them and created this bracelet. It's quite simple really but I have never done one like this before using connectors and eye pins. I have always used chain to make my bracelets, but this bracelet is a chain of connectors, eye pins, and jump rings.


 You can make a bracelet in the same simple way, of course, not exactly like mine since it isn't likely you'll find the same connectors that I used. But if you have a couple of connectors(like charms but with a loop on each end), beads, eye pins, jump rings, and a pair of clasps, you can make your own creations with this same technique.


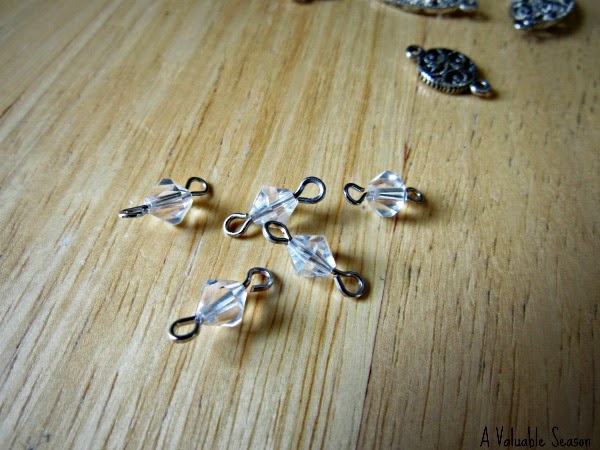
Eye pins can be a bit tricky until you get the hang of them. You slide your bead on and then cut the pin to the right length for making a loop of equal size to the one already made. If you need some help with this you can check out a tutorial here.


Depending on what kind of a bracelet you are making you can put different kinds of beads on the eye pin. I wanted a dressy one to wear with my dresses and such, so I used these white(or more like clear) crystal beads that made it look fancy and yet neutral so I could wear it with almost any color.


Here you can see all three of the pieces to the chain, a connector, a jump ring, and an eye pin with a bead. The rest was a piece of cake, connecting all of the pieces in order until I had the full bracelet, including the clasp.


 I love this pretty new bracelet. I even made one for Laryssa with the extra connectors that I had left over.

I would have liked to try it in the different colors I have, like dark purple, light blue, or light green, but the white is very lovely and goes well with almost everything, which is a definite plus. ;)


Friday, May 8, 2015

Wonderful Books!


  A week or two ago, Laryssa and I with our mom went to our grandmas to help her pack to move. She is a big reader, and has tons of books, most of which she was getting rid of now that she is moving. So we were packing up all the old books she didn't want to keep in a whole bunch of boxes to take to the Goodwill or the library.


  I didn't really care about getting rid of all these books, since most of them were romance novels, but she did have a huge collection of old Readers Digest books that were so irresistible that I couldn't let them go. Surprisingly I had never seen them there before, but I'm awfully glad I spotted them before they got sent off to the Goodwill.


  I couldn't keep all of them unfortunately(there really were a lot!), so I just picked out my favorites.


  I simply love the look of these books! The hardback covers on them are just so awesome!!


  I have never heard of any of the titles in these books, but I believe they are condensed versions of novels. I have no idea what they might be like but, hey, I need something to read anyway. I brought them home cause I love the covers, but, who knows, maybe they will be interesting reading.


 So book lovers, what do you think? Share your thoughts in the comments.


Monday, May 4, 2015

Beef and Rice Enchiladas


Like I said before, I LOVE Mexican food. So today I'm sharing an enchilada recipe. My favorite recipe so far has been with chicken(oh it's simply heavenly), but when my mom asked me to make dinner last week, we didn't have any chicken, so I made this beef and rice enchilada recipe instead.

This was the first enchilada recipe I ever made, and I fondly remember making it for the first time with my older brother. Such sweet memories. :) Except when we made it we didn't know any better to cook the rice first. Haha!

Here are the ingredients:

1 pound ground round
1 medium onion, chopped
1/2 cup chopped green bell pepper
1 tablespoon minced garlic
1 can(6 oz.) tomato paste
3/4 cup water
1 cup cooked white rice
3 cups shredded cheddar cheese (divided)
1 1/2 teaspoons dried oregano
1/2 teaspoon dried thyme
1/2 teaspoon fennel seed
1 teaspoon garlic salt
1 tablespoon chili powder
12 flour tortillas (about 10 inches) warmed
8 ounces picante sauce or salsa
1 can (about 10 oz.) enchilada sauce.


The first step is to cook the beef, along with the peppers, onions, and the minced garlic. As you may have noticed, my meat here isn't beef. It's actually venison, which we've had since last deer season, but it doesn't make a big difference.


While the meat is cooking, you can go ahead and prepare your rice, which is going to be the next thing added to the skillet, along with all of these awesome ingredients.


After the meat is cooked and drained, add the picante sauce or salsa(I used salsa), tomato paste, garlic salt, fennel seed, oregano, thyme, chili powder, water, rice, and 2 cups of cheese(Yeah, don't go by the picture. I only have one cup of cheese sitting there). :)


Once all of the necessary ingredients are added to the skillet, cook it over low heat until it thickens (about ten minutes according to the recipe).

Doesn't it look sooooo good! This is when you get that amazing smell of the Mexican food we love!

Sooo Good!


Now, to actually make the enchiladas. First you need to pour some enchilada sauce into your baking dish. It doesn't need to be a lot, and you're going to put more on top of the enchiladas then, which will pour down into the pan anyway. Still, make sure it is well covered.


For tortillas I just bought really big ones(burrito size) and they actually turned out pretty well. And I might add that I still had more enchiladas than the recipe said it would make. You can use smaller ones, but I imagine the smaller they are the harder they will be to wrap up and keep together.

For filling the enchiladas, if you need a reference, the recipe says 1/2 cup of beef mixture for a 10 inch tortilla. But it really isn't too hard to figure it out yourself, especially since you may use different sized tortillas.


 Roll it up tight and carefully place in the pan with the seam down.


Pour the rest of the enchilada sauce over the enchiladas. I was kind of running out of sauce for mine. :(  Note: Make sure you have plenty of sauce.

 And then....


Put all the rest of the cheese on top!! Oooh yummy yum! But if I were you, I wouldn't go with the recipe on this one(1 cup of cheese). Just put on all the cheese you want!! :)

Set the oven for 350 degrees, and put the enchiladas in for 8-10 minutes(or until heated through and cheese melts).

And Tada!


You can now serve your family a delicious, Mexican meal that will be sure to please! :)

I ended up with a total of fifteen enchildas(I might have used more than a pound of meat; the bag didn't say how much it weighed.) So we had some leftovers, which is totally fine with me cause these still taste awesome when reheated.

 As a little extra for you, I also cooked up some refried beans for this meal. No I didn't actually make the refried beans. But I did cook them differently.


We usually just put them in a big bowl and then add cheese later, but this time I put the beans in a baking dish, topped with lots of cheese, and baked it in the oven for a while. Maybe you all have figured this out already, but it was so much easier than heating and reheating in the microwave. Plus, I could put on a lot more cheese and actually have it melt.

So, I hope you will enjoy this recipe as much as my family has, and keep coming back for more!