.post-body img { margin-left: -40px;}
Showing posts with label Crafts. Show all posts

Monday, September 21, 2015

Making Creative Chalkboards


 Summer is almost over! I can't believe it's gone by so fast! And even more shocking is that I haven't posted anything all Summer! It has been a fairly busy Summer for me, but mostly I just haven't been doing a lot of post worthy things. So now I'm trying to pick up the slack and get back in the swing of blogging. :)

 To start it off I tried something I've always wanted to do. Paint with Chalkboard Paint! I had been wanting to give that a try in the worst way and I finally just broke down and did it(A Michael's gift card helped with that :) ). Now what I originally had planned for the Chalkboard Paint was something a bit bigger than this(which I'll share at a later time), but I need to prepare a few things for that project first, so today I'm showing you the smaller project.

 It was my mom's idea actually, so I can't take the credit for this. She had these old clipboards she was planning to get rid of when she happened to think that I could use them with my Chalkboard paint. What and excellent idea!


I sat outside to paint this cause the lighting for the pictures would be better. Plus it was a beautiful day. :)

The directions for the paint say that you need two coats. One you apply vertically and the other horizontally, with the space of an hour between each coat.


Second coat all done! After you've painted on both coats the paint needs to cure for 24 hours before use. Then...


 ...it's chalkboard time!


 Clipboard to chalkboard. Not a bad idea! :) Have fun coming up with your own creative ideas for chalkboards and share in the comments!

Monday, May 25, 2015

A Lovely White Bracelet


 I've been working on my jewelry lately, attempting to make new bracelets using different techniques. I'm especially interested in using different cording like suede and leather to make the more rustic, country kind of style I'm fond of. But since I'm not posting any of that right now you know I haven't had much success with it. I'm working on a bracelet right now that I finally put together, but then realized it was too big.


  However, I have had success with this lovely bracelet. I wasn't even planning this one, it just happened. I was looking around at Michaels, mostly in the jewelry section, and found a pack of metal connectors on sale. Yippee! So I bought them and created this bracelet. It's quite simple really but I have never done one like this before using connectors and eye pins. I have always used chain to make my bracelets, but this bracelet is a chain of connectors, eye pins, and jump rings.


 You can make a bracelet in the same simple way, of course, not exactly like mine since it isn't likely you'll find the same connectors that I used. But if you have a couple of connectors(like charms but with a loop on each end), beads, eye pins, jump rings, and a pair of clasps, you can make your own creations with this same technique.


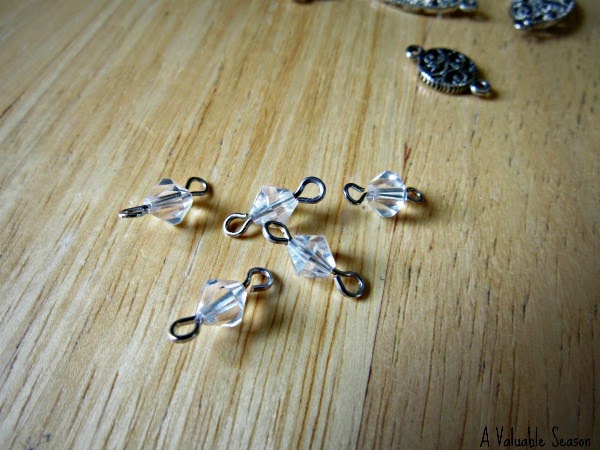
Eye pins can be a bit tricky until you get the hang of them. You slide your bead on and then cut the pin to the right length for making a loop of equal size to the one already made. If you need some help with this you can check out a tutorial here.


Depending on what kind of a bracelet you are making you can put different kinds of beads on the eye pin. I wanted a dressy one to wear with my dresses and such, so I used these white(or more like clear) crystal beads that made it look fancy and yet neutral so I could wear it with almost any color.


Here you can see all three of the pieces to the chain, a connector, a jump ring, and an eye pin with a bead. The rest was a piece of cake, connecting all of the pieces in order until I had the full bracelet, including the clasp.


 I love this pretty new bracelet. I even made one for Laryssa with the extra connectors that I had left over.

I would have liked to try it in the different colors I have, like dark purple, light blue, or light green, but the white is very lovely and goes well with almost everything, which is a definite plus. ;)


Monday, April 20, 2015

Scrapbooking Beach Vacation


 Yes, I did have to get my bro's permission to put this on here. He thinks its creepy, but I think it's the coolest picture. Anyhow, our second vacation trip to Ocean City, Maryland included a night of eating crabs, or at least trying to eat them (we had nothing to crack the outer skeletons with)! As I'm writing this, I'm thinking of how I could've recorded the story in words for my page like I'm doing right now. Unfortunately, I'm not one to record the stories behind the pictures when I'm scrapbooking. But I really would like to start doing that more often. I'll most likely forget though, because it takes me the longest time just to decide on the layout of the page. I suppose that's maybe a good thing though.

 It's funny sometimes, to think that there can be so many different ways to paste a few pictures and some paper together. That's the challenge for me, when it comes to scrapbooking. Trying to incorporate new patterns, making a new page look different than the one I just did, keeping it fresh. All without breaking the bank on a hobby that I don't even do very regularly. There are a lot of awesome gadgets out there that are really neat and that I'd love to get my hands on sometime. But to tell the truth, if you gave me a jumbo book of scrapbook paper and a few stickers, I'd actually be pretty content. I find it enjoyable to utilize the huge array of endless patterns and colors of paper for my pages. There are just so many things that you can do with paper.

 So as you've gathered already, I don't have a bunch of fancy tools, but I do still have fun with it. And, of course, the most satisfying part about scrapbooking is when I look back on my scrapbooks years later, where all those sweet, priceless memories are stored and where the highlight of a moment is displayed with a splash of colorful design. That, for me, is the reward of scrapbooking.

 For our 2014 vacation, I plan to make two pages: One crazy-fun, bright and sunny page, and one calm, mellow, reflective page. As you can guess, the crab page is the fun one. The awesome paper from Michael's made designing this a cinch. I don't know if it's a recent craze or if it's always subtly   been there, but I've discovered that I really like polka dots. I'm not what one might consider a girly girl, but there's something about polka dots that expresses my style quite well. So, as you can tell from the page, I like polka dots.

 Okay, so now some food for thought about my crab page.

Title

 One crucial element of a well done scrapbook page is it's title. A page can be beautifully designed and yet have an unfinished look if the title doesn't do it's job. The title of a page is what gives it character. The title can either be subtle or bold, melancholy or joyful, serious or funny. It can be small, large, fancy, swirly, rigid, diagonal, straight, and so on. The title, along with a few other factors, is what determines the mood of the page. For my crab page, I wanted to capture the fun that we were having that night at our condo eating these crabs (over which I lost my appetite and with which I wanted nothing to do with...yuck)! So I wanted the letters of my title to be big and bold. I wanted them to stand out. Also, I want them slanted. Anytime you want a hint of fun and excitement in your page, just slant your title and pictures. It always does the trick. Another thing I like to do sometimes to add some pizazz is to take some paper that is already in the page, like the red polka dot corners on this page, and cut out letters (either with stencils or just by writing them yourself) to use for the title. This really helps to establish a color theme too.


Stickers

 I don't use stickers a lot, but when I do, they're usually letters and or something neutral that will match with more than one page. The idea of getting specific stickers for a single scrapbook page is really awesome, but it can get pricey. So when I do buy stickers, I try to find ones that I can use for more than one page. Nonetheless, when you have a 50% off coupon for Michael's, why not get stickers for a specific page, right? I must say, I had a lot of fun in the sticker isle picking out these adorable crabs, and they added the perfect touch to my page! In fact, I might even do that more often when Katlynn gives me coupons.


 What is it about scrapbooking that you find satisfying? Do you have any hints or tricks you'd like to share? I'd love to hear from you in the comments!

  Happy Monday, Everyone!


Saturday, March 28, 2015

Button Tree


  At last I'm writing a new post! You all probably thought you weren't going to hear from us again. :) Well things have been pretty busy around here, with working, horse sitting, getting over colds, and working on new projects. But now I've finally completed a craft this week that I've been wanting to make for a while. A button tree!

 When I first saw this idea on Pinterest, I was on a button craze. I looked up different kinds of button crafts( I'm sure you saw my button bracelet) but this one really stuck in my mind. I thought to myself, "If I felt like doing a big project that would take a while I would do that right there."
And not long after that my mom started looking for a big picture to hang on the empty wall behind our couch, and I proposed this option.

 So here is how I made this adorable button tree canvas.

First off, you will need:

. A canvas
. Acrylic paint for your background and for the tree
. Buttons in various colors and shapes(I used pretty much all green except for a little bit of light brown, or you could go with multiple colors. Your choice.)
. Pencil and paintbrushes
. Tacky glue

So to get started you need to paint your entire canvas. The example I got from Pinterest(see here)actually used spray paint in different colors. Whatever works for you. I used acrylic paint in a khaki color to go with the country, folk art theme of our living room.

Then, very lightly, draw your tree with a pencil. Going with my particular theme, I chose to do a willow tree.

Once your happy with your drawing, go ahead and paint it, giving it an extra coat if necessary to make it dark and the brush strokes less noticeable.


Then it's time for the buttons! When the tree is completely dry, put all the buttons in place, making sure everything is the way you want it. And when you're satisfied, glue all the buttons in place. This is the longest most tedious part of the project, but hang in there, cause when it's done it will be beautiful!


And when the glue has had enough time to dry completely, your button tree will be ready for duty as a beautiful decoration in your house! I hope you enjoy this project as much as I did, and thanks for reading. :)


Thursday, March 12, 2015

Button Bracelet


 Even though, on the one hand, I like delicate and fine chain jewelry, I also like the more rustic, country style. And compared to that last bracelet I made, this one is definitely "rustic".


 I got a basic inspiration for this bracelet just by browsing online. I had seen several similar bracelets with some kind of, perhaps, leather cording, with buttons attached, but I didn't go off of any particular idea for this. I just decided it was about time to make a button bracelet, and sat down to figure out a way to do it.

 A few notes about making this bracelet:

. It was SO easy! Once I had the plan figured out it was a piece of cake. Anyone can make this! :)

. Very easy to put on with one hand(always a plus).

. You know how, with bracelets, the clasp end(the one you usually want to be on the bottom)is always twisting around to the top? Well with this bracelet it doesn't matter. The clasp is only a loop and a button, so it really isn't that noticeable anyway.


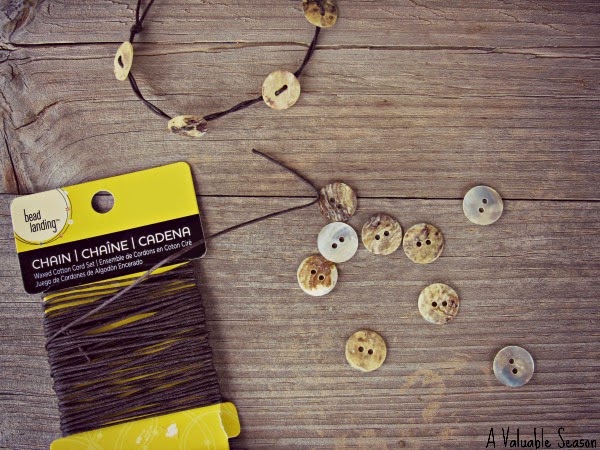
Okay, so to make this bracelet yourself, you just need some buttons, and some kind of cording. I used a thin, waxed cotton cord, which is very bendable and small enough to fit through those little button holes.


  After you cut your cord, bend it in the center to make a loop. Make it big enough for your button to fit through easily, then tie a knot to secure it.


 You will then have two separate cords branching out from the knot. Loop the buttons on the individual strands, spaced out how you like them, and alternate between the two strands. After doing this, I twisted the strands around each other to make it hold it's shape better and to keep the buttons facing the right way. This just brings the bracelet together well. Then make sure you have the right length to fit your wrist, and tie the last button onto the loose ends. And that's it!


So there's my button bracelet. An easy, simple project, with awesome results. I think it's one of my favorites now! :)


Saturday, February 28, 2015

Handmade Dog Bed


 Guess what I made this week? A handmade dog bed! Okay, so maybe that isn't really exciting to everybody, but if you have a dog it might make him happy. :)

  Our dog has never had a dog bed(we always just put old blankets in her crate), so when I saw this idea on Pinterest(http://www.handimania.com/diy/sweatshirt-pet-bed.html), I just had to make it myself for our little Molly.

What I love about this is that it reuses common supplies(shirt and pillow), that it really didn't take too long, and that it was so easy! You can very easily just hand sew this with yarn in a couple hours.

Okay, on with the instructions!

You'll need:

1. a shirt
2. a pillow
3. some kind of stuffing
4. some scrap material
5. needle, yarn, thread
6. scissors


To start, you need to sew the shirt collar closed, but leave a small opening for stuffing it later. The front and back of this shirt wasn't even so I cut out some of the back part to make for easy sewing. This made an inward curve at the back of the dog bed, but that doesn't bother me too much(and I really don't think Molly minds it either). Oh, a note about the yarn. I suppose you could use thread but I liked using the yarn(except for the hassle of getting it on the needle) cause it's really strong and makes the sewing quicker.


Okay, once you've finished sewing up the top, you need to sew a long line across the chest area, from armpit to armpit.


The next step is to sew the sleeves. Line up the bottom edges of the sleeves with the sides of the shirt and sew all the way down, stopping when you reach the cuffs.


Once both sleeves have been sewn, you're ready to start stuffing! I used a polyester filling, since that was what I had on hand, but you could really use whatever you think might be good for stuffing.

By sewing the line from armpit to armpit, then sewing the sleeves to the sides, you create a semi ring around the middle, so stuff it well for a big puffy rim, only leave the cuffs unfilled. Then when you're all done filling it you can go ahead and sew up the opening at the top.


Now for the main cushion of the bed. Stuff a pillow in the shirt body and sew the opening closed. If you use a regular, long pillow like I did, you'll want to curve it upwards a bit, so it puffs up.


Then wrap the ends of the sleeves around the middle and sew them together securely.


To cover up that ugly stitching, wrap a piece of material around it and sew the ends together(with thread now, not yarn :) ), but don't sew it to the sleeves yet. First flip the material around so your stitching is in the back.


Then you can go ahead and sew the new piece to the sleeves.


And, tada! You just made a dog bed for your furry friend!


I think Molly is quite happy with her new, super comfy bed. Despite the fact we were there snapping pictures of her first time trying it out. :)


Friday, February 13, 2015

Chip-Beaded Bracelet


  I had told my sister that I would make her a bracelet sometime, and after finding an idea online(I got it from here ), I finally set to making her one. The bracelet appealed to me right away, with it's pretty gold chain and chip beads, and as soon as I saw it I thought of Laryssa. So here is my latest jewelry project with some basic instructions so you can make your own!


 If you want to make this pretty bracelet you will need some chain(I like the gold color for this but you can use anything you like), a clasp, jump rings(I used two different sizes but that is just up to the way you want yours to look), an eye pin, and of course your beads.
 You will start by picking out your beads. I happened to have some chip beads on hand in various colors and Laryssa picked out the orange and blue colors to match a scarf that she has. But if you don't have chip beads, I'm sure this would look just as good with different kinds of beads.


 Put your beads on the eye pin with just enough room left to make a loop. If you don't know how to do this you can get some instructions here. Now I did notice that my piece was much smaller than the one I saw online, so I guess my eye pins were just smaller. Just take note that if your wanting a larger piece with more beads you'll need a longer eye pin. Okay, next the chain. As far as measurement goes I usually just wing it and adjust if it's too large. Or if you're one for more precision you could always measure your wrist, then measure your beaded piece, and the amount of chain you'll need to wrap around, taking into account the length of the clasps and such, but I find it easier to just make it a little large and then shorten it as need be. So separate your chain pieces, remembering that you will need it to be double the length you want.
 Now how I did mine was make the chain in a loop by attaching the two ends onto a jump ring linked onto my beaded piece. You could also do it the other way around, depending on what you think looks nicer. But since I was going to use smaller jump rings to attach my clasps, I figured the less chain I had to put on a small jump ring the better.


You see here the two ends of my chain are attached to the jump ring.

See how my chains are made into loops?


 For bracelets, I love to use toggle clasps. They look so pretty and they can be easy to put on with one hand if your bracelet isn't too short. To attach the clasp pieces put on a jump ring and attach them to the middle link of your chain loop. To be sure that you actually have one middle link, you might want to cut your chain with an uneven number of links. So there you have it! A fairly easy project really, especially if you already know what your doing when it comes to jewelry making. But if not, feel free to ask any questions in the comments and I'll do my best to answer. Happy jewelry making!


Tuesday, January 13, 2015

Jewelry Making

  One of my Christmas gifts this year was a gift card for my favorite store... MICHAELS! I Love Michaels. It's a crafts and arts paradise! I would love to have hours upon hours to just browse the whole store(though I'd probably end up spending too much money). There are many things I would love to buy at Michaels, but with my gift card, I bought only jewelry supplies. Before I went in I made up a list of the basic things I needed, so that I wouldn't be hours upon hours trying to figure out what to get. :) And even with my list it was overwhelming. A whole row of strung beads, in every color, in every shape and size. So many charms of so many things, in so many styles. And then the chain and the cording, and clasps and every kind of jewelry piece. Needless to say, I took a while longer than I thought I would. And after I had gotten everything I needed, I set to work on some new jewelry.
  I'm not really all that creative, so I usually have to find my ideas online, at least for inspiration. So these are all inspired from pictures online, but with my own bead choices, etc.
The first bracelet I wanted to make was made with some kind of leathery cording. But since I found a different cording for a little less money, I just improvised. I actually really like the way this one
turned out.

The hard part was finding beads that I liked that had holes big enough to fit the chord, and still not look bulky. I went around and around trying to find the right beads and then Laryssa came over, took a few minutes, and found the perfect beads for me. I had been thinking something with color, particularly blue or orange, but these beads look awesome! They gave the bracelet a more rustic look, and still had a small color variation. :) This was a really simple bracelet to make. Slide the beads on, tie the knots, and attach the clasps.
 Oh, and the little charm on the end. It was just a simple one I had on hand, and decided it would be a nice addition. So, great bracelet, and it goes well with most of my clothes. And if I want to I can make similar bracelets with different colored beads(if I can find any). :)
 Now for the next bracelet. I saw an idea for an ocean bracelet, with just a simple chain, sea charms, and large simple beads in ocean colors. I already had several sea charms, which I kept trying and failing to make a good bracelet with, so I decided to give it a try. My own bracelet didn't turn out as nice as I had hoped, but I like it better than any of my other attempts.
I found a pack of two chain bracelets already made and with my favorite kind of clasp, and since I already had other remains of chain I haven't used yet(but didn't want to use for this project), I went with this. I thought it wouldn't be too bad using a large chain, but looking at it now I think the chain is too big for the beads. I don't know, maybe it just needs more beads. But anyway, I do love the beads. It didn't take me very long to decide on these. They're blue(I almost always end up wearing blue), and they just look oceany! :) Definitely a summer bracelet, so I'll get to test it out then.
 And last of all I made a new necklace. I had been throwing around the idea of using a metal ring and dangling beads off of it, and I finally decided to give it a try.
I didn't use very many beads(it's a small ring), but I still think it looks neat. Something different. When I was picking out beads, I knew I wanted to use this kind. I just didn't know what color. I love green, and these beads all came in a pack together. I love the yellow and green combination, I just have to find something in my wardrobe that will match it. Again, this was super simple. The necklace I bought already made. It's so delicate and even the right length! So all I had to do was put the beads on, which actually wasn't that easy, come to think of it. Trying to get the loops on those head pins just right is difficult, but I made it work out in the end. So that's all for my latest jewelry making projects. You got something to read and I got some new jewelry to wear. :)

Thursday, December 4, 2014

Homemade Rustic Ornaments

 After refraining from writing about my recent bout with clutter and its unavoidable frustration, I decided to turn to a more positive subject.
 It's Christmas time again and the tree was just put up last week. Last year's tree picking was definitely wait too late for my liking, so I was quite happy when we got it the Saturday after Thanksgiving this year. Much better.
 So here is our wonderful "country" Christmas tree, complete with homemade tree skirt made out of a burlap bag and other fabrics, homemade garland, and almost all homemade ornaments!


All three of us girls (that is, including mom) made the garland. It's really quite simple, but not at all a short project (it took several days to complete.) It's made of strips of fabric tied onto a long string of yarn. That's all. But believe it or not, its actually kind of fun to make...especially when your doing it with someone else!
 And then of course, there's the cute little, or should I say, cute and plump sheep. They were really easy to make too. All I used was a round piece of  quilt batting glued to cardboard along with black fabric for the face, ears, and legs. And of course red ribbon for the bow. Gotta love bows!


I was so excited to finally hang up the very first ornaments I made this fall...the Christmas trees. Lovely addition!
 
  So now that we have the Christmas tree up and trimmed, making the living room extra cozy at night (and even during my favorite time of day...early morning, when it's still dark), Christmas music playing all day long, and Christmas shopping officially starting...I'd say it's beginning to look a lot like Christmas!