

Even though, on the one hand, I like delicate and fine chain jewelry, I also like the more rustic, country style. And compared to that last bracelet I made, this one is definitely "rustic".
I got a basic inspiration for this bracelet just by browsing online. I had seen several similar bracelets with some kind of, perhaps, leather cording, with buttons attached, but I didn't go off of any particular idea for this. I just decided it was about time to make a button bracelet, and sat down to figure out a way to do it.
A few notes about making this bracelet:
. It was SO easy! Once I had the plan figured out it was a piece of cake. Anyone can make this! :)
. Very easy to put on with one hand(always a plus).
. You know how, with bracelets, the clasp end(the one you usually want to be on the bottom)is always twisting around to the top? Well with this bracelet it doesn't matter. The clasp is only a loop and a button, so it really isn't that noticeable anyway.
Okay, so to make this bracelet yourself, you just need some buttons, and some kind of cording. I used a thin, waxed cotton cord, which is very bendable and small enough to fit through those little button holes.
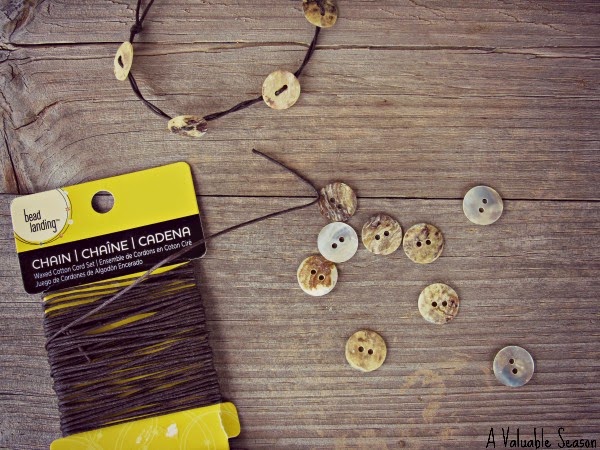
After you cut your cord, bend it in the center to make a loop. Make it big enough for your button to fit through easily, then tie a knot to secure it.

You will then have two separate cords branching out from the knot. Loop the buttons on the individual strands, spaced out how you like them, and alternate between the two strands. After doing this, I twisted the strands around each other to make it hold it's shape better and to keep the buttons facing the right way. This just brings the bracelet together well. Then make sure you have the right length to fit your wrist, and tie the last button onto the loose ends. And that's it!

So there's my button bracelet. An easy, simple project, with awesome results. I think it's one of my favorites now! :)
I love it; the brown color and how you did it are so pretty!
ReplyDeleteThank you. I'm glad you like it. :)
Delete