.post-body img { margin-left: -40px;}

Thursday, February 19, 2015

Chicken Fajita Quesadillas


As you all may have noticed from reading our blog, Laryssa is the cook.

 However, despite appearances, I can cook(not that good), and I will cook(occasionally). And when I do it is 99% of the time to make something Mexican. In fact, through the last several months the only cooking/baking I have done is two Mexican based meals, and a batch of oatmeal muffins! So recently my mom suggested that I try making meals for the family more often, with an added comment that I should make something that wasn't foreign for once. :) Nevertheless, my family loves Mexican food, and I usually don't hear any complaints when I say I'm going to make enchiladas again.

 That's what I normally make, enchiladas, but last Saturday I tried something new. A recipe for chicken fajita quesadillas! Okay, so it's not what you would call authentic Mexican by any means, but Tex Mex tastes just as good to me. I found this recipe, Chicken Fajita Quesadillas, on Pinterest and couldn't resist the look of those tasty, cheesy wonders. And following my usual style, I didn't bother with directions too much. I just got the basic idea and used my own spices, and now I'll share it with you.

You will need:

1. Boneless chicken breasts

2. Bell Peppers(variations of colors are nice)

3. Onion

4. Cheese

5. Chili Powder, Paprika, Garlic Powder(Cumin also would be good, I just didn't have any at the time)

6. Oil

7. Flour tortillas

First thing you want to do is cut up your chicken and peppers and onions. You don't want your chicken to be thick, so I sliced the chicken breasts in half(see this website here http://www.simplyrecipes.com/recipes/chicken_fajitas/). When I did mine, I cut it into strips and then cut those into smaller pieces. But looking back, I think it would have been best if I had cut the chicken more fine or in much smaller pieces.


Next, put some oil in the skillet to fry the chicken. The recipe I was going off of called for fajita seasoning mix, which I didn't have and wouldn't bother buying in the first place. So I looked up fajita seasonings online. I came up with Chili Powder, Paprika, Garlic Powder, Cumin, and a few other things, but I decided to just go with the first three. So add a generous amount of your choice of seasonings(the fun part!).


Yummy!

Then once the chicken is done you can replace it with the peppers and onions. They will pick up some of the seasonings leftover in the skillet from the chicken, but go ahead and add some more anyway. This will bring out the flavor even more! And oh, the heavenly aroma!


Alright then. Once your chicken and vegetables are all finished, it's time to make the quesadillas!
 Place a tortilla in the skillet with oil, then cover it with the chicken, peppers and onions, and cheese.


Then place another tortilla on top and when the bottom tortilla is browned, flip the whole thing over to fry the other side.


 Now you will see in these pictures that I used a whole tortilla. I would suggest that you NOT do it this way. It is a headache you want to avoid. The tortilla was so heavy and I didn't have a spatula big enough to pick up the whole thing. So when I tried to flip it, some of the filling fell out and the tortilla was fragile, and oh what a mess! Here's what I suggest: Cut your tortilla in half before frying, place both halves in the skillet and top the one with the chicken and etc. Then when it's done frying, flip the one onto the other and take off of the skillet. That way, you don't even have to flip the entire quesadilla. I tried it this way and believe me, it works much better. :)


After removing your quesadilla from the skillet, cut it into four triangles(or two if you already cut the tortilla in half to fry), and enjoy!


Wednesday, February 18, 2015

Learning to Learn from My Mother


 Life as an adult daughter staying at home can be wonderful in many, many ways. At the same time, it has it's difficulties. As I am now "all grown up," I have my own ideas and opinions of what a house (or at least the house I am living in) should look like, what it should consist of, and how it should operate.
  
My mom and I have a lot of similarities, but when it comes to household routine, we can be very different. Concerning her domestic duties, mom is easy going, craftsy, and an out-side-of-the-box-kind-of-thinker. Her kind of house is clean and cozy. On the other hand, I am nit-picky, routine-obsessed, and a picture-perfect-kind-of-thinker. Everything must be in it's place (everything from the camping tent to the kitchen can opener). Anyone living in the same house with me will tell you I am crazy about organization. My kind of house is structured and tidy.

Now, I can not begin to tell you how much I love and appreciate my mom or how much I admire the beautiful example she is to me as a wife and mother. She is an amazing mom who deserves all the credit I'm giving her. I recognize that God has purposely made each of us different for very specific and wonderful reasons. Also, the major differences in the personalites that the Lord has given to my mom and I have actually been of benefit to both of us. For as you probably know and have experienced, similar personalities clash more so than dissimilar ones. So believe it or not, our contrasting characteristics have actually lead to a deep, compatible, mother-daughter relationship.

Nonetheless, the personality difference can be a challenge. I think a huge part of our dissimilarity is that mom usually speaks her mind (which isn't always a bad thing, by the way), while I hardly ever speak my mind. So here is a typical conversation between us that goes on practically every day. "Did you feed the dog?" mom will ask (usually followed by "Did you feed Tiger? Did you feed Gracie? Did you feed Follow?"{our cats}). I say yes or no and then think (to myself of course), "Why can't we have a system...we must have a system (or I'll go crazy)!"

 I think just about every daughter out there, who's greatest desire is to be a wife and mother, has probably dreamed and re-dreamed of what her house and family will look like someday. I know I certainly have. Often times, when I picture myself being a mom, living out life with her husband and children, I tend to get anxious (maybe a little too anxious). I start to think of how I would do things differently. For instance, the dog (if we have one) will NOT be aloud on the furniture (ha! ha!...my family knows this already). I would plan (or at least want to plan) every single meal. I would have an official laundry day. The list could go on I'm sure. But you get the picture. Anyway, my mind starts running like this and then suddenly I want to take control. I want to do everything a mother would do. Once again, I must say that my mom is very allowing in this area (remember, I said she was easy going). She's given me lots of leeway to discover and learn how things are done and how things work. She's let me "take over" grocery shopping more than once, whenever I was helping with couponing. She's let me plan the bathroom "makeover" the way that I wanted it. I'm telling you, if there's a mom out there that allows and encourages her daughters to experiment and get their "hands on" housewife life, it's my mom. 

 I often have to remind myself that part of the reason Katlynn and I decided to stay at home is so that we could learn and prepare ourselves for serving our future families. Part of that learning is daily watching our mom and being willing and humble enough to be taught by her. I so often forget that I have had zero experience with being an actual housewife, whereas mom has had 20+ years of it! How little I forget just how much I can be learning from her and gaining wisdom that will stay with me for a life time. Living ordinary life in an ordinary home as a grown daughter can be so beneficial in that you are watching your future "dream" in action. That special dream will hopefully one day come true, but it will most likely look quite different from the way we saw it. Ordinary family life is just that...it's ordinary, it's mundane, and most of all, it's real. And the blessing of staying at home while you're not married yet is that you see the realness of it. You'll know not to expect a perfect house where everything is in it's place. You'll know not to expect perfectly behaved children dressed in their perfectly matching outfits. You'll know not to expect a perfect day where everything on the list gets done. But most importantly, you'll know that God's grace will carry you through. 

 So here is my encouragement to all daughters at home, anxiously awaiting their "turn to be the mom." There is a season for all things and everything is beautiful in it's time. Daughterhood is a beautiful thing and we should not be so hasty to move on to the greener grass on the other side. In the end, life is fleeting. This time of singleness will likely be gone before you know it, and then you'll look back on all those wonderful memories and wonder why you wanted it to be over so fast.
 So be patient and most importantly, learn from your mom...you will never regret it! 
 

Tuesday, February 17, 2015

Granola Bar Gifts


 In my last post about making bread, I said that small steps to a "homemade kitchen" simply thrills me. Well, I've found yet another homemade recipe to replace a store-bought item that we often buy...granola bars. Katlynn especially enjoys granola bars for a snack, so since they can be so expensive (even with coupons), I decided I'd try making them myself. There's probably a million recipes out there for granola bars, but I stumbled upon this one while searching online and it's served my purpose quite well. The ingredients list is actually rather small which makes this recipe extremely easy and fast to make. This also makes a quick gift to wrap up for any special occasion (it just happened to be Valentine's Day when I made these).
 The recipe calls for any kind of Bisquick mix, meaning if you have a homemade recipe on hand, your in luck! Of course if you have actual Bisquick, that would work too. But the frugal way to go would be to make your own, which is also very easy and doesn't take long at all (I'll include the recipe I've been using for a while now).
 Also, I like this recipe because it gives room for flexibility when it comes to what kind of granola bar you want to make. In fact, there are even a few suggestions listed at the bottom of the recipe.


Homemade Chewy Granola Bars   GroceryBudget101.com

1 1/2 c. Bisquick*

1 1/2 c. quick-cooking oats

1 c. brown sugar

1/2 c. butter or margarine, softened

1 egg

1/3 c. chocolate chips (optional)

Instructions

1. Heat oven to 350 degrees.

2. Combine all ingredients and mix well.

3. Spread batter in un-greased, 13x9 pan and press firmly

4. Bake 15-17 minutes (cut into bars while still warm)

Variations

Add any of the following instead of or in addition to chocolate chips.

1/3 c. chopped dried apples and 1 tsp. cinnamon

1/3 c. powered milk (for a breakfast bar)

1/3 c. raisins, craisins, or dried cherries

1/3 c. chopped walnuts or almonds

*Homemade Baking Mix (from The Amish Cook's Family Favorite Recipes)

9 c. flour

1/3 c. baking powder

1 Tbsp. salt

2 tsp. cream of tartar

1/4 c. sugar

1 c. dry milk

2 c. shortening

1. Sift all ingredients together except shortening

2. Cut in the shortening

3. Use as Bisquick mix!


Gift Wrapping!

Granola Bars can be a really neat and unique gift idea for Valentine's Day or any other holiday or special occasion. To wrap them individually, I used a rectangular piece of foil. It was kind of like wrapping a miniature gift! Then I used some ribbon to tie bows around each one. You can then place however many individually wrapped granola bars into a container (I used a tin box), dress it up (I used ribbons), and label with customizable, printable labels (like the ones I found here)!


Friday, February 13, 2015

Chip-Beaded Bracelet


  I had told my sister that I would make her a bracelet sometime, and after finding an idea online(I got it from here ), I finally set to making her one. The bracelet appealed to me right away, with it's pretty gold chain and chip beads, and as soon as I saw it I thought of Laryssa. So here is my latest jewelry project with some basic instructions so you can make your own!


 If you want to make this pretty bracelet you will need some chain(I like the gold color for this but you can use anything you like), a clasp, jump rings(I used two different sizes but that is just up to the way you want yours to look), an eye pin, and of course your beads.
 You will start by picking out your beads. I happened to have some chip beads on hand in various colors and Laryssa picked out the orange and blue colors to match a scarf that she has. But if you don't have chip beads, I'm sure this would look just as good with different kinds of beads.


 Put your beads on the eye pin with just enough room left to make a loop. If you don't know how to do this you can get some instructions here. Now I did notice that my piece was much smaller than the one I saw online, so I guess my eye pins were just smaller. Just take note that if your wanting a larger piece with more beads you'll need a longer eye pin. Okay, next the chain. As far as measurement goes I usually just wing it and adjust if it's too large. Or if you're one for more precision you could always measure your wrist, then measure your beaded piece, and the amount of chain you'll need to wrap around, taking into account the length of the clasps and such, but I find it easier to just make it a little large and then shorten it as need be. So separate your chain pieces, remembering that you will need it to be double the length you want.
 Now how I did mine was make the chain in a loop by attaching the two ends onto a jump ring linked onto my beaded piece. You could also do it the other way around, depending on what you think looks nicer. But since I was going to use smaller jump rings to attach my clasps, I figured the less chain I had to put on a small jump ring the better.


You see here the two ends of my chain are attached to the jump ring.

See how my chains are made into loops?


 For bracelets, I love to use toggle clasps. They look so pretty and they can be easy to put on with one hand if your bracelet isn't too short. To attach the clasp pieces put on a jump ring and attach them to the middle link of your chain loop. To be sure that you actually have one middle link, you might want to cut your chain with an uneven number of links. So there you have it! A fairly easy project really, especially if you already know what your doing when it comes to jewelry making. But if not, feel free to ask any questions in the comments and I'll do my best to answer. Happy jewelry making!


Monday, February 9, 2015

How to make Homemade Bread from Scratch


My ultimate dream home would be one in which all the meals and all the ingredients for the meals would be homemade or homegrown. Obviously this wouldn't just happen overnight, but it excites me when we make one small step towards that end.
 One of those steps for me is when I find a good recipe for a certain food that we'd normally buy from the store, and then replace the store-bought product for the homemade. Probably the most beneficial and thrilling achievement I've made in this area is making homemade bread versus buying it from the store every week. Not that bread is the most expensive grocery item that we buy, but at our house, a loaf of bread sure goes fast...that and milk. So now all we need is a cow. =) But anyway, making bread is really quite fun once you get the hang of it. For me, it's just become part of the weekly routine. We have a family of six, so two homemade loaves usually last us two days. So I'm now baking bread every other day, which isn't entirely necessary I suppose, assuming I could make more in one day and then freeze some. But I've really come to enjoy baking bread. Like I said, it's just become a part of the routine, and routine makes me happy. Not only that, but when I make bread more often, we have fresher bread more often as well. And that, I believe, makes everyone happy. =)
 So, let's get down to business, shall we?

Homemade White Bread (from the kitchn)

1 c. water, lukewarm
2 tsp. yeast, active-dry

2 Tbsp. butter, unsalted
1 c. milk
2 Tbsp. sugar
1 Tbsp. salt

5 1/2 c. flour

1. Pour the water in a mixing bowl and sprinkle yeast over the top to dissolve.


The water shouldn't be dish-water hot or it'll kill the yeast. But it shouldn't be too cool either. Shoot for lukewarm water. Once you make this several times, you'll eventually get a feel for the right temperature.
 In order to proof the yeast (make sure that it's living), I usually sprinkle about 1/2 Tbsp. of the sugar over top as well. You can mix the yeast and sugar into the water if you want, but usually I get yeast stuck on the spoon this way, so I prefer to just let it sink to the bottom. The yeast will then feed on the sugar, causing it to foam up. Oh and, make sure you watch it foam... it's really awesome! I've been making bread for almost a year now and I still like watching the yeast gradually sprout up to the top.

2. As the yeast is dissolving, melt the butter in a small bowl. Add heated milk, sugar, and salt; stir. Then pour the milk and butter mixture into the yeast water.


Make sure that you make a mental note to heat the milk in the microwave. If you don't, you'll end up with a messy counter top and a broken bowl (like I unfortunately had, one baking day)! Hot, melted butter and icy cold milk do not mix!

3. Now add one cup of flour and stir.

 It will be lumpy like this, but no worries.

4. Keep adding flour and stirring until dough forms into a ball. Then dump it onto a floury surface.


 If you're like me and try to scrape every last scrap of dough off the bowl and spoon, you'll spend more time making bread than you really want to. Try to ignore the inclination, get most of the dough out, and then move on. Nitpickiness won't serve you well here, especially if you plan to make bread weekly.
 At this point, I usually let the bowl soak in water since I'll need it to be clean for later, after I'm done kneading. That way the dough doesn't harden on the bowl and so it's easier to wash.

5. Knead dough for 8-10 minutes, adding flour as needed.


Once again, this is something that you'll just get the feel for eventually. At first, the dough will stick to your hands, but it's perfectly fine. You can add good amounts of flour until it's less sticky. Nonetheless, after you've been kneading for a while, be cautious of adding too much flour. If it's still sticking to your hands, just add small amounts at a time (I just grab a little flour with the tips of my fingers).
 As for kneading, the pictures above should hopefully help illustrate how it's done. Basically, it's a 3 step process. First, stretch the dough out with one hand. Make sure you are actually stretching the dough, not just flattening it. Remember, what you're actually doing here is trying to stretch the yeast strands so they're good and strong. Secondly, fold the dough in half. And thirdly, turn the dough so that the fold is facing right or left. Then, repeat the steps until you've got a nice, strong mound of dough.
 Kneading is just about the best part of making bread, and is one of the reasons I don't use a bread-machine. There's something about kneading that I find appealing. Maybe it's the steady rhythm or the feeling of the dough against my hands, or maybe it's the process of stretching the yeast until it's good and strong. At any rate, it might get tiring or even frustrating at first. But there comes a point where you know how much flour to add or when you know you've kneaded it enough. When the dough is ready to rise, it'll be elastic and will sit in a tight ball without drooping. Or, you can use my favorite method, the window pane test. Simply pinch off a golf-size piece of dough, roll it into a ball, and then slowly stretch it with the tips of your fingers and hold it up to the window. If the dough doesn't tear and if it's transparent enough so the light shines through it, then your ready for the next step!


6. Place the dough in a clean bowl (the one you've soaked in water, if you wish) and cover with either plastic wrap or a damp kitchen towel.


 In the cold, winter months, fresh-out-of-the-oven bread is amazing! But trying to find a warm environment for your dough to rise can be challenging. I've used several different methods but I've found this one to work the best. Place the covered-dough on a baking tray and then fill the tray with the hottest water you can get from your kitchen faucet. Place it in the oven and then lay a towel over the bowl and the tray so that the heat from the water is contained. Close the oven door and wait for the dough to rise!


7. Once the dough has doubled in size, punch it down and separate the dough into 2 parts. Then place them on the counter to rest for 10 minutes. Meanwhile, grease 2 bread pans (shortening and a dusting of flour works best). Form each ball into a loaf (here's a helpful video on how to form a sandwich loaf), place them in the pans, cover, and let them rise a second time (you can use the same rising method).


 8. Once the dough has risen over the top of the pans, preheat the oven to 425 degrees. As soon as the dough is in the oven, reduce the temperature to 375 degrees and bake the bread for 30-35 minutes. Bread will generally be darker on the top than on the sides when done.


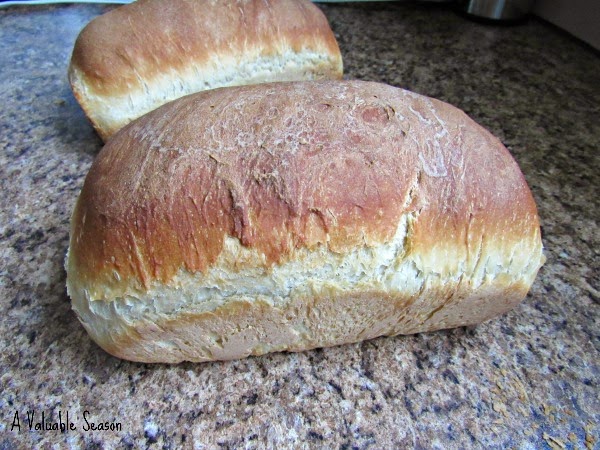
Open the oven to find two golden-brown loaves of pure goodness! 


I know it's tempting to dive right in, but cutting the loaves before they've cooled prevents the crust from softening. You'll notice that the crust is really hard when you first take them from the oven, but once they've cooled, the crust gets nice and soft. I'm not a fan of tough crust, so I normally like to let them cool first. Nonetheless, fresh warm bread is awfully hard to resist, so we sometimes wait at least 10 minutes and then treat ourselves to a hot loaf.

 When I first started making bread, the best advice I found was to choose a recipe and stay with it. If it didn't turn out the first time, don't keep trying new recipes until you get it right. But rather choose one recipe and try, try again until you've mastered it. I've been using this recipe ever since I started making bread last spring and it turns out better and better the more I practice and take note of what I did differently. I like this recipe, particularly because the measurements are so easy to remember. So after a while, I didn't need to keep referring back to the recipe. If you can then, it's very helpful to try to memorize the measurements.

 I hope you found this helpful and that you'll come back for some more delicious homemade bread recipes. Wish you the best in your bread-making adventures! Happy baking!
 

Friday, January 30, 2015

Simple Dress Refashion

 I'm so excited about the blog and the new look. And with the new look Laryssa and I have started up a new project...clothing refashions! It's like sewing your own clothes, but easier because it's already made. All you have to do is alter it the way you want it! I think this idea is awesome because
 1) you can make your clothes the way they fit you best
 2)  make them more modest
 3) you can save a lot of money!
 Do you have any thrift stores around where the clothes are cheap? You can get clothes that may be too big, too old fashioned, or too immodest and refashion them to fit better or give them a totally new look!
 I really wanted to try this, so Laryssa and I decided to take up the hobby together, and for our first refashion we redid this brown dress I found at Goodwill.


 As you can see in the first picture, it's a rather boring, plain old dress with a few problems. For one, the V-neckline was way too low, and also there was a great big slit in the bottom of the dress which was too revealing. But what I did like about it was that it was brown(one of my favorite colors to wear), and that it was a button down(a favorite style of mine). So I bought it and Laryssa and I made plans for the refashion, which only required three simple fixes.

 1) The first thing we did was sew up the giant slit in the bottom(Well actually Laryssa sewed it. I'm terrified of sewing machines and needles so I help with the planning, ironing, etc.).

2)Then the neckline obviously needed to be corrected, and fortunately the dress came with an extra button. Laryssa made a new button hole at the neckline and sewed on the extra brown button.

 Perfect! That took care of the modesty needs, but it still wasn't finished. The dress came with a sash, a simple brown one made of the same material(forgot to put it on for the picture), but it was boring and not very noticeable.

3) So for the finishing touch we made a brand new sash. We found a nice blue material in our stash of yard sale fabrics to add more color, and tied it in a bow for that extra flavor.

 The instructions for making the sash we found at this website: alteredcloth.com. It's an easy guide and tells you how to get the width that you want for your particular sash.


 This dress was so easy to do, since it only needed a few simple changes, and I saved a lot of money. It was a $5 dollar dress, buried in among all the other bland dresses thrown on the rack. And $5 dollars is pretty much all I spent on it, seeing that we already had some scrap material around for the sash, and we had the brown thread and the button that came with it. So if you like to sew your own clothes but it's so hard to do, and fabric is expensive, just go to any thrift store in your area where you know you can get good deals and have fun finding clothes that you can refashion. For inspiration you can look online to get an idea of what kinds of things you can do. And of course, you can always keep coming back here to A Valuable Season, where we plan on posting more of our refashioning projects.

Wednesday, January 28, 2015

Homemade Grape-Nuts


Crumbly, crunchy, and delectably sweet, this homemade version of Grape-Nuts will make a perfect addition to your breakfast menu. With a smidgen of patience and a little extra time, you can make your own cereal that tastes even better than store-bought! I heartily recommend this yummy recipe to anyone ready to try their hand at a unique and worth-while venture. My family loved them, and I'm sure yours will too!

Homemade Grape-Nuts (from the Thrifty Frugal Mom )

6 c. brown sugar
11 2/3 c. whole wheat flour
3/4 c. oil
3 c. sour cream or yogurt
1 tbsp. vanilla
1 tbsp. salt
1 tbsp. baking soda
2 c. buttermilk

Frugal Tips

- If you're looking for the healthier way, yogurt would be best. But I'm fairly certain that sour cream is generally cheaper than yogurt, so that's what I used.
-Our family doesn't usually have buttermilk on hand, so a homemade buttermilk recipe really comes in handy here. It sounds difficult, but all you have to do is add 1 Tablespoon of vinegar or lemon juice to every 1 cup of milk that the recipe calls for. Let it sit for 5 minutes and that's all. Easy!

Instructions

1. Preheat oven to 350 degrees.

2. Mix everything together except the buttermilk. Then gradually add the buttermilk. You will then    have a cookie-like dough.

3. Spread onto 3 greased cookie trays (If you don't have that many trays, you can use other pans, as long as they're large enough so that the batter cooks through).

4. Bake for 30 minutes and allow to cool (cut the large "cookies" into squares and flip over to cool faster).

5. Pulse the squares of batter until the whole batch resembles large crumbs.

6. Place them back on the trays and let dry in warm oven (200 to 225 degrees) for several hours. Stir occasionally. When done, the Grape-Nuts will be crunchy.

7. Enjoy your Homemade Grape-Nuts with a splash of milk, a handful of granola, or just plain!

My Notes

 I am so excited about learning how to make my own, homemade cereals! Bought at the store, breakfast cereal is so expensive, particularly the healthy kind, and in my opinion it doesn't compare to homemade cereal at all. Of course, in my opinion, anything homemade beats store-bought.=)
 This was my first cereal-making attempt that turned out wonderfully. Now, I must note that this recipe is very time-consuming. So before you dive right into it like I did, I suggest that you set a full day aside (not knowing how long it would take, I started making them mid-day and had to finish them the next morning)!
 I absolutely loved this recipe, particularly because it's a bulk recipe. The Grape-Nuts in the picture are only half of what the recipe actually made. I stored the rest of it in two freezer bags and froze them. So these last a long time.


Thursday, January 22, 2015

An Old Cake and A New

The next winter birthday is January 10th, Jeremy's birthday. After so many birthdays, it can be hard thinking of a good theme for a cake that hasn't already been done, and yet one that they will still enjoy. Of course, if the recipe is the same, they're sure to enjoy it no matter what it looks like.
 Jeremy's all-time favorite sport is football and he likes the Steeler's, but we already did a Steeler's cake the year before last (the Steeler's cake picture is in the first "cakes" post). Then last year, we did this humungous tower of sweetness.


  Who doesn't like Kit-Kats and M&M's? Not to mention, who doesn't like Kit-Kats and M&M's together on a double-layered cake with peanut butter icing?! Okay, some might think it sounds kind of gross (and it was rather sickening, so one tiny sliver was quite enough), but for anyone with a major sweet tooth, it's paradise.

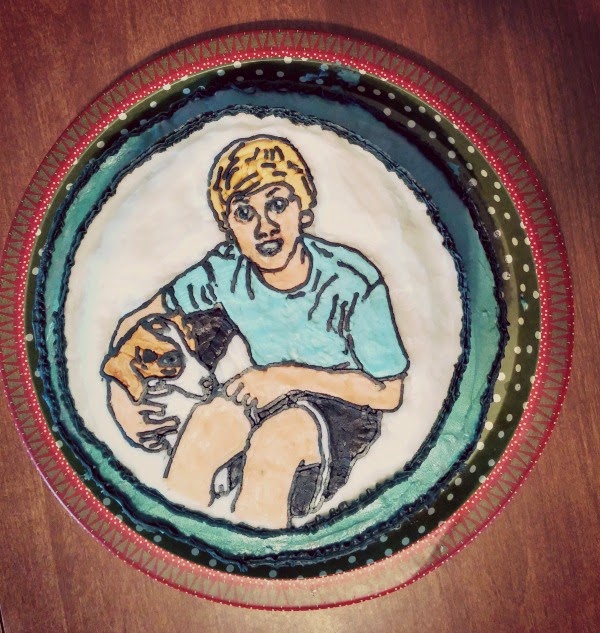
 So that was last year's cake. For this year, we decided we'd try to "trace" a picture we have of Jeremy and Molly (our beagle) together. I won't show the actual picture because the final image on the cake really doesn't look much like the original (but goodness, we used icing)! Obviously, we new it wouldn't be detailed, so Katlynn turned the picture into a drawing, by editing it at iPiccy.com, so we had a simplified version of the photo. Then we used our favorite technique to trace and transfer the finished product onto the top of the cake (our technique is explained here: http://avaluableseason.blogspot.com/2014/10/cakes.html). And...voilla!


Tuesday, January 13, 2015

My Two Enemies: Clutter and Disorganization

Clutter is one of my worst enemies. To me, there's nothing worse than a coffee table with no room for coffee among all the books and magazines piled sky-high,  a computer desk with an endless variation of letters, papers, CD's, and whatever else anyone might have put there for a "moment," and a kitchen counter covered with things that really could fit in that extra space in the cupboard. So as you might have guessed by now...I love, love, love to organize!
 Something I have to remind myself about organizing is that the entire house cannot be organized in one day. Once I start any kind of organization, I have difficulty focusing on just one project because it seems like it's all inter-connected (and it is, in a way). But that's how it works, just one bit at a time. So, here are a few of my projects I've completed lately.


 This is an idea that I got off of Pinterest that I thought was a great idea: each member of the family gets a box (clutter box, as I like to call it) for their own individual clutter. Then a certain someone (me of course =) goes around picking up all the clutter, which inevitably grows like weeds around here, putting each person's clutter in their box. Then the boxes should be emptied once in a while into each person's room. The advantages for such a system? Well, first of all, I won't get the run-down from anyone who lost something because I happened to put it away, since it will most likely be in their box where they'll find all their "missing" items. Secondly, it really does help keep any smooth, flat surfaces, such as coffee tables, desks, and kitchen counters, clear of clutter, of course not free of clutter. That will be the day when all tables and counters are forever free of clutter. But anyway, it really does help. Now, I know these aren't the prettiest looking organizers, but here's where my frugality comes into play. The picture on Pinterest showed four neat, perfectly matching baskets. And as we don't usually have four neat, perfectly matching baskets laying around, but a whole lot of boxes (from lots of online ordering) and plenty of yard sale fabrics, I threw these together one night. With a bit of hot glue, I wrapped the boxes in fabric, then used laminated index cards to label them. Now, there are six of us in the household, not four. But some of us share rooms, so I just made boxes for each of the rooms upstairs. Obviously, unless they were really long stairs, it would look rather crazy with six boxes all lined up! Anyway, as I said, they aren't the most gorgeous things you ever saw, but they get the job done.
                                                  

Yep, more fabric-covered "boxes." For these, I actually used those baskets that the mandarin oranges come in. As they aren't exactly decorative, I used more fabric as a cover-up. Again, not exactly beautiful, but helpful. They're hard to see in the picture, but they have labels: one for mail, one for church mail, and one for receipts. Not surprisingly, I usually still have to go through the mail sitting on the kitchen table. But, dad doesn't have the time, and I do...so it works. Not to mention I love sorting anyway!
                                                                             

Up next...kitchen cupboard clean up. I absolutely love using spices when I cook, lots and lots of spices. But it's almost unbearable when you're happily cooking along and suddenly become extremely aggravated because that one spice you need is lost among the gazillion containers that all look the same. So this was my project today. All together, I used  7 boxes/containers (I used up-cycled tea boxes, a coffee filter box, and basically anything I could find around the house) and then grouped all of the spices into categories. So for instance, the chili powder, garlic powder, onion powder, and curry powder all went in a box titled "Powders." All the seeds, like poppy seeds and fennel seeds, went in another, and so on. I can't even begin to imagine how much easier and stress-less cooking and baking will be from now on. And all it took was a pleasant hour or more of planning and sorting. What fun!
  

Jewelry Making

  One of my Christmas gifts this year was a gift card for my favorite store... MICHAELS! I Love Michaels. It's a crafts and arts paradise! I would love to have hours upon hours to just browse the whole store(though I'd probably end up spending too much money). There are many things I would love to buy at Michaels, but with my gift card, I bought only jewelry supplies. Before I went in I made up a list of the basic things I needed, so that I wouldn't be hours upon hours trying to figure out what to get. :) And even with my list it was overwhelming. A whole row of strung beads, in every color, in every shape and size. So many charms of so many things, in so many styles. And then the chain and the cording, and clasps and every kind of jewelry piece. Needless to say, I took a while longer than I thought I would. And after I had gotten everything I needed, I set to work on some new jewelry.
  I'm not really all that creative, so I usually have to find my ideas online, at least for inspiration. So these are all inspired from pictures online, but with my own bead choices, etc.
The first bracelet I wanted to make was made with some kind of leathery cording. But since I found a different cording for a little less money, I just improvised. I actually really like the way this one
turned out.

The hard part was finding beads that I liked that had holes big enough to fit the chord, and still not look bulky. I went around and around trying to find the right beads and then Laryssa came over, took a few minutes, and found the perfect beads for me. I had been thinking something with color, particularly blue or orange, but these beads look awesome! They gave the bracelet a more rustic look, and still had a small color variation. :) This was a really simple bracelet to make. Slide the beads on, tie the knots, and attach the clasps.
 Oh, and the little charm on the end. It was just a simple one I had on hand, and decided it would be a nice addition. So, great bracelet, and it goes well with most of my clothes. And if I want to I can make similar bracelets with different colored beads(if I can find any). :)
 Now for the next bracelet. I saw an idea for an ocean bracelet, with just a simple chain, sea charms, and large simple beads in ocean colors. I already had several sea charms, which I kept trying and failing to make a good bracelet with, so I decided to give it a try. My own bracelet didn't turn out as nice as I had hoped, but I like it better than any of my other attempts.
I found a pack of two chain bracelets already made and with my favorite kind of clasp, and since I already had other remains of chain I haven't used yet(but didn't want to use for this project), I went with this. I thought it wouldn't be too bad using a large chain, but looking at it now I think the chain is too big for the beads. I don't know, maybe it just needs more beads. But anyway, I do love the beads. It didn't take me very long to decide on these. They're blue(I almost always end up wearing blue), and they just look oceany! :) Definitely a summer bracelet, so I'll get to test it out then.
 And last of all I made a new necklace. I had been throwing around the idea of using a metal ring and dangling beads off of it, and I finally decided to give it a try.
I didn't use very many beads(it's a small ring), but I still think it looks neat. Something different. When I was picking out beads, I knew I wanted to use this kind. I just didn't know what color. I love green, and these beads all came in a pack together. I love the yellow and green combination, I just have to find something in my wardrobe that will match it. Again, this was super simple. The necklace I bought already made. It's so delicate and even the right length! So all I had to do was put the beads on, which actually wasn't that easy, come to think of it. Trying to get the loops on those head pins just right is difficult, but I made it work out in the end. So that's all for my latest jewelry making projects. You got something to read and I got some new jewelry to wear. :)