.post-body img { margin-left: -40px;}

Monday, May 25, 2015

A Lovely White Bracelet


 I've been working on my jewelry lately, attempting to make new bracelets using different techniques. I'm especially interested in using different cording like suede and leather to make the more rustic, country kind of style I'm fond of. But since I'm not posting any of that right now you know I haven't had much success with it. I'm working on a bracelet right now that I finally put together, but then realized it was too big.


  However, I have had success with this lovely bracelet. I wasn't even planning this one, it just happened. I was looking around at Michaels, mostly in the jewelry section, and found a pack of metal connectors on sale. Yippee! So I bought them and created this bracelet. It's quite simple really but I have never done one like this before using connectors and eye pins. I have always used chain to make my bracelets, but this bracelet is a chain of connectors, eye pins, and jump rings.


 You can make a bracelet in the same simple way, of course, not exactly like mine since it isn't likely you'll find the same connectors that I used. But if you have a couple of connectors(like charms but with a loop on each end), beads, eye pins, jump rings, and a pair of clasps, you can make your own creations with this same technique.


Eye pins can be a bit tricky until you get the hang of them. You slide your bead on and then cut the pin to the right length for making a loop of equal size to the one already made. If you need some help with this you can check out a tutorial here.


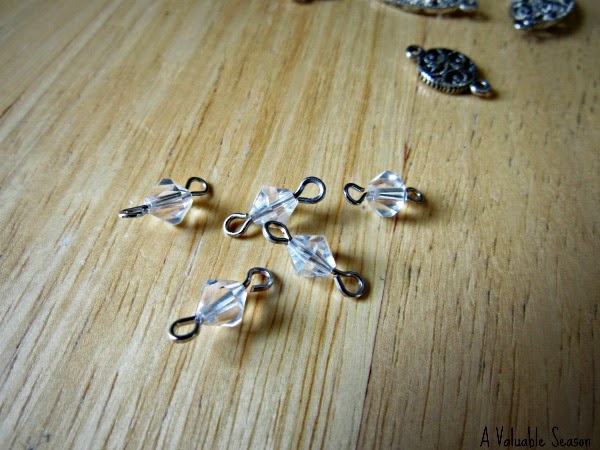
Depending on what kind of a bracelet you are making you can put different kinds of beads on the eye pin. I wanted a dressy one to wear with my dresses and such, so I used these white(or more like clear) crystal beads that made it look fancy and yet neutral so I could wear it with almost any color.


Here you can see all three of the pieces to the chain, a connector, a jump ring, and an eye pin with a bead. The rest was a piece of cake, connecting all of the pieces in order until I had the full bracelet, including the clasp.


 I love this pretty new bracelet. I even made one for Laryssa with the extra connectors that I had left over.

I would have liked to try it in the different colors I have, like dark purple, light blue, or light green, but the white is very lovely and goes well with almost everything, which is a definite plus. ;)


Friday, May 8, 2015

Wonderful Books!


  A week or two ago, Laryssa and I with our mom went to our grandmas to help her pack to move. She is a big reader, and has tons of books, most of which she was getting rid of now that she is moving. So we were packing up all the old books she didn't want to keep in a whole bunch of boxes to take to the Goodwill or the library.


  I didn't really care about getting rid of all these books, since most of them were romance novels, but she did have a huge collection of old Readers Digest books that were so irresistible that I couldn't let them go. Surprisingly I had never seen them there before, but I'm awfully glad I spotted them before they got sent off to the Goodwill.


  I couldn't keep all of them unfortunately(there really were a lot!), so I just picked out my favorites.


  I simply love the look of these books! The hardback covers on them are just so awesome!!


  I have never heard of any of the titles in these books, but I believe they are condensed versions of novels. I have no idea what they might be like but, hey, I need something to read anyway. I brought them home cause I love the covers, but, who knows, maybe they will be interesting reading.


 So book lovers, what do you think? Share your thoughts in the comments.


Monday, May 4, 2015

Beef and Rice Enchiladas


Like I said before, I LOVE Mexican food. So today I'm sharing an enchilada recipe. My favorite recipe so far has been with chicken(oh it's simply heavenly), but when my mom asked me to make dinner last week, we didn't have any chicken, so I made this beef and rice enchilada recipe instead.

This was the first enchilada recipe I ever made, and I fondly remember making it for the first time with my older brother. Such sweet memories. :) Except when we made it we didn't know any better to cook the rice first. Haha!

Here are the ingredients:

1 pound ground round
1 medium onion, chopped
1/2 cup chopped green bell pepper
1 tablespoon minced garlic
1 can(6 oz.) tomato paste
3/4 cup water
1 cup cooked white rice
3 cups shredded cheddar cheese (divided)
1 1/2 teaspoons dried oregano
1/2 teaspoon dried thyme
1/2 teaspoon fennel seed
1 teaspoon garlic salt
1 tablespoon chili powder
12 flour tortillas (about 10 inches) warmed
8 ounces picante sauce or salsa
1 can (about 10 oz.) enchilada sauce.


The first step is to cook the beef, along with the peppers, onions, and the minced garlic. As you may have noticed, my meat here isn't beef. It's actually venison, which we've had since last deer season, but it doesn't make a big difference.


While the meat is cooking, you can go ahead and prepare your rice, which is going to be the next thing added to the skillet, along with all of these awesome ingredients.


After the meat is cooked and drained, add the picante sauce or salsa(I used salsa), tomato paste, garlic salt, fennel seed, oregano, thyme, chili powder, water, rice, and 2 cups of cheese(Yeah, don't go by the picture. I only have one cup of cheese sitting there). :)


Once all of the necessary ingredients are added to the skillet, cook it over low heat until it thickens (about ten minutes according to the recipe).

Doesn't it look sooooo good! This is when you get that amazing smell of the Mexican food we love!

Sooo Good!


Now, to actually make the enchiladas. First you need to pour some enchilada sauce into your baking dish. It doesn't need to be a lot, and you're going to put more on top of the enchiladas then, which will pour down into the pan anyway. Still, make sure it is well covered.


For tortillas I just bought really big ones(burrito size) and they actually turned out pretty well. And I might add that I still had more enchiladas than the recipe said it would make. You can use smaller ones, but I imagine the smaller they are the harder they will be to wrap up and keep together.

For filling the enchiladas, if you need a reference, the recipe says 1/2 cup of beef mixture for a 10 inch tortilla. But it really isn't too hard to figure it out yourself, especially since you may use different sized tortillas.


 Roll it up tight and carefully place in the pan with the seam down.


Pour the rest of the enchilada sauce over the enchiladas. I was kind of running out of sauce for mine. :(  Note: Make sure you have plenty of sauce.

 And then....


Put all the rest of the cheese on top!! Oooh yummy yum! But if I were you, I wouldn't go with the recipe on this one(1 cup of cheese). Just put on all the cheese you want!! :)

Set the oven for 350 degrees, and put the enchiladas in for 8-10 minutes(or until heated through and cheese melts).

And Tada!


You can now serve your family a delicious, Mexican meal that will be sure to please! :)

I ended up with a total of fifteen enchildas(I might have used more than a pound of meat; the bag didn't say how much it weighed.) So we had some leftovers, which is totally fine with me cause these still taste awesome when reheated.

 As a little extra for you, I also cooked up some refried beans for this meal. No I didn't actually make the refried beans. But I did cook them differently.


We usually just put them in a big bowl and then add cheese later, but this time I put the beans in a baking dish, topped with lots of cheese, and baked it in the oven for a while. Maybe you all have figured this out already, but it was so much easier than heating and reheating in the microwave. Plus, I could put on a lot more cheese and actually have it melt.

So, I hope you will enjoy this recipe as much as my family has, and keep coming back for more!


Monday, April 27, 2015

Easy Backyard Compost


 Composting...what an interesting idea. Using all that yucky, gooey stuff that would normally fill your garbage can, as food for soil. Soil that feeds your plants. Luscious, green plants that will feed your family. Hopefully, all winter long. 
 Does a compost pile sound complicated to you? I thought the same at first. But what if a compost pile could be contained and covered in such a discrete and clever way that you wouldn't even see or smell it. What if it could be stored in a neat, tidy tote, sitting in the corner of your house or garage? What if all that you needed to have your own backyard compost, were things you already have at home, right now? That's what I thought too. Fantastic.

 So let's get started, shall we?

  Step 1: Find a large, plastic tote around the house that has a lid. Maybe in the basement or attic. If your storing something in it, find somewhere else to store those things. Better yet, save yourself the hassle. If it's been over a year since you've used whatever is in there, it's time to make a trip to the thrift store or add to your yard sale pile. After all, less is more.
 I found this tote in our basement (thus the dust). It wasn't serving any practical purpose down there, so what better job could it have than to hold our garden's compost. Perfect. 


 Step 2: Drill 8-10 holes in the bottom of your tote. If you want, ask your handy, dandy, awesomely generous brother to do it for you, in case you haven't ever used a drill before, like me. The cat can help too, of course.


 Step 3: Drill the same amount of holes in the lid.


   Step 4: Fill the bottom of the tote 1/8-1/4 of the way full with dry leaves or shredded newspaper.


  Step 5: Now add dirt until the tote is half full.


 Step 6: Next up...garbage. Yep. I started with sweet potato leftovers, an apple core, shredded newspaper, and coffee grounds with the filter (I was seriously waiting around to make the afternoon pot of coffee so I could use the grounds). There's plenty to learn about what exactly to put in your compost and what not to put in. But I'm just now learning the basics too, so I'd suggest doing some good ole' research. Lots of fun. No, really. It is. 

  
Step 7: Cover up your garbage scraps and cover with the lid.


 Step 8: Decide where to put your compost container. Find a discrete, shady spot, such as in a corner of your house or garage. And keep adding garbage!


 The instructions that I was following said to wait 2-3 months before using. I can't wait! 

 Have you found a tote yet? Don't hesitate to give it a try. It is so incredibly easy and quick to set up. If you already have a compost pile, are planning on building one, or know of more composting methods, I'd love to hear about it in the comments!   


Monday, April 20, 2015

Scrapbooking Beach Vacation


 Yes, I did have to get my bro's permission to put this on here. He thinks its creepy, but I think it's the coolest picture. Anyhow, our second vacation trip to Ocean City, Maryland included a night of eating crabs, or at least trying to eat them (we had nothing to crack the outer skeletons with)! As I'm writing this, I'm thinking of how I could've recorded the story in words for my page like I'm doing right now. Unfortunately, I'm not one to record the stories behind the pictures when I'm scrapbooking. But I really would like to start doing that more often. I'll most likely forget though, because it takes me the longest time just to decide on the layout of the page. I suppose that's maybe a good thing though.

 It's funny sometimes, to think that there can be so many different ways to paste a few pictures and some paper together. That's the challenge for me, when it comes to scrapbooking. Trying to incorporate new patterns, making a new page look different than the one I just did, keeping it fresh. All without breaking the bank on a hobby that I don't even do very regularly. There are a lot of awesome gadgets out there that are really neat and that I'd love to get my hands on sometime. But to tell the truth, if you gave me a jumbo book of scrapbook paper and a few stickers, I'd actually be pretty content. I find it enjoyable to utilize the huge array of endless patterns and colors of paper for my pages. There are just so many things that you can do with paper.

 So as you've gathered already, I don't have a bunch of fancy tools, but I do still have fun with it. And, of course, the most satisfying part about scrapbooking is when I look back on my scrapbooks years later, where all those sweet, priceless memories are stored and where the highlight of a moment is displayed with a splash of colorful design. That, for me, is the reward of scrapbooking.

 For our 2014 vacation, I plan to make two pages: One crazy-fun, bright and sunny page, and one calm, mellow, reflective page. As you can guess, the crab page is the fun one. The awesome paper from Michael's made designing this a cinch. I don't know if it's a recent craze or if it's always subtly   been there, but I've discovered that I really like polka dots. I'm not what one might consider a girly girl, but there's something about polka dots that expresses my style quite well. So, as you can tell from the page, I like polka dots.

 Okay, so now some food for thought about my crab page.

Title

 One crucial element of a well done scrapbook page is it's title. A page can be beautifully designed and yet have an unfinished look if the title doesn't do it's job. The title of a page is what gives it character. The title can either be subtle or bold, melancholy or joyful, serious or funny. It can be small, large, fancy, swirly, rigid, diagonal, straight, and so on. The title, along with a few other factors, is what determines the mood of the page. For my crab page, I wanted to capture the fun that we were having that night at our condo eating these crabs (over which I lost my appetite and with which I wanted nothing to do with...yuck)! So I wanted the letters of my title to be big and bold. I wanted them to stand out. Also, I want them slanted. Anytime you want a hint of fun and excitement in your page, just slant your title and pictures. It always does the trick. Another thing I like to do sometimes to add some pizazz is to take some paper that is already in the page, like the red polka dot corners on this page, and cut out letters (either with stencils or just by writing them yourself) to use for the title. This really helps to establish a color theme too.


Stickers

 I don't use stickers a lot, but when I do, they're usually letters and or something neutral that will match with more than one page. The idea of getting specific stickers for a single scrapbook page is really awesome, but it can get pricey. So when I do buy stickers, I try to find ones that I can use for more than one page. Nonetheless, when you have a 50% off coupon for Michael's, why not get stickers for a specific page, right? I must say, I had a lot of fun in the sticker isle picking out these adorable crabs, and they added the perfect touch to my page! In fact, I might even do that more often when Katlynn gives me coupons.


 What is it about scrapbooking that you find satisfying? Do you have any hints or tricks you'd like to share? I'd love to hear from you in the comments!

  Happy Monday, Everyone!


Friday, April 17, 2015

From Short Dress To Long Dress


   Well, like I said I would, I've brought you some more clothing refashions. And here is the latest.

I actually made this maybe a month ago now, but I just recently decided to put it on the blog. I'll be honest, I was a bit worried about showing this to the world. I'm so new at this kind of thing and this was my very first dress to sew myself(Yes, I mastered my fear of sewing machines and actually enjoyed myself). It's not the greatest dress in the world, and I'm not sure if I'm actually going to wear it anywhere or not, but here it is. :) 

 Here's how I made it:

 I started out with a large tan dress I picked up at the Goodwill for five dollars. You could hardly call it a dress really, the length being more like a short night gown, so I imagined turning it into a shirt(By the way this picture was after I had already cut it shorter for a shirt). But there was a problem with this. Like I said the dress was kind of big, but it fit me in the upper body. It was around my middle that it was too large and baggy. I wanted to try to take it in some, but because of the seams in the front it would have been difficult.


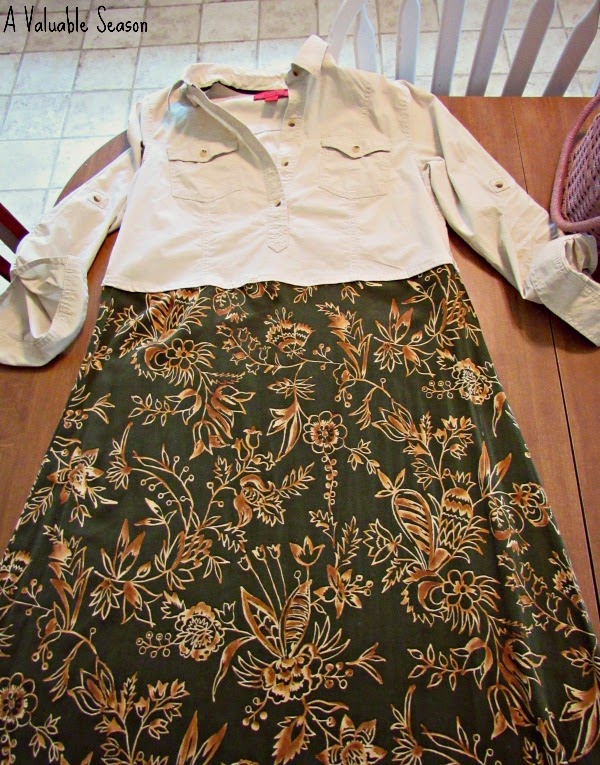
So my mom suggested making a dress out of it by sewing on a skirt. I had seen ideas for that already and agreed it would be good. So I went to the thrift store and found a long, dark green skirt to match, and began making a dress instead.

I started by cutting the top even shorter so that it would be above my waist and at the point where it fit me the best.


I then cut the elastic out of the skirt, hemmed both pieces of the dress, and pinned them together.


  Then carefully(and a little nervously)sewed the dress. Like I said, this was my first time actually sewing with the sewing machine, so it didn't come out beautifully.


And when I finished the sewing I sighed with relief and went "Ugghh". It looked kind of funky, with the hem of the top making a little lip over the skirt, and I realized I probably should have done it the other way around. It was also very baggy and looked utterly ridiculous on me, until I put on the belt with it, which I had already planned. But of course it couldn't be simple and just work. The point at which the two pieces were sewn together had to be completely covered, but the belt didn't do this very well. It wouldn't stay in place and it looked terrible. So I came up with the solution to sew the belt in place and make it a permanent piece of the dress. And fortunately the belt I had already bought at the Goodwill was weaved, so that made the job a lot easier. :)


In the end then, it was an interesting experience and I believe it taught me a few things about sewing. :) And even though I'm not sure yet if I'll ever wear it anywhere, I do like the looks of this dress. It just feels like my style.


So I hope you enjoyed reading about my latest refashion project, and maybe even got some inspiration for your own creative refashions.