.post-body img { margin-left: -40px;}

Friday, January 30, 2015

Simple Dress Refashion

 I'm so excited about the blog and the new look. And with the new look Laryssa and I have started up a new project...clothing refashions! It's like sewing your own clothes, but easier because it's already made. All you have to do is alter it the way you want it! I think this idea is awesome because
 1) you can make your clothes the way they fit you best
 2)  make them more modest
 3) you can save a lot of money!
 Do you have any thrift stores around where the clothes are cheap? You can get clothes that may be too big, too old fashioned, or too immodest and refashion them to fit better or give them a totally new look!
 I really wanted to try this, so Laryssa and I decided to take up the hobby together, and for our first refashion we redid this brown dress I found at Goodwill.


 As you can see in the first picture, it's a rather boring, plain old dress with a few problems. For one, the V-neckline was way too low, and also there was a great big slit in the bottom of the dress which was too revealing. But what I did like about it was that it was brown(one of my favorite colors to wear), and that it was a button down(a favorite style of mine). So I bought it and Laryssa and I made plans for the refashion, which only required three simple fixes.

 1) The first thing we did was sew up the giant slit in the bottom(Well actually Laryssa sewed it. I'm terrified of sewing machines and needles so I help with the planning, ironing, etc.).

2)Then the neckline obviously needed to be corrected, and fortunately the dress came with an extra button. Laryssa made a new button hole at the neckline and sewed on the extra brown button.

 Perfect! That took care of the modesty needs, but it still wasn't finished. The dress came with a sash, a simple brown one made of the same material(forgot to put it on for the picture), but it was boring and not very noticeable.

3) So for the finishing touch we made a brand new sash. We found a nice blue material in our stash of yard sale fabrics to add more color, and tied it in a bow for that extra flavor.

 The instructions for making the sash we found at this website: alteredcloth.com. It's an easy guide and tells you how to get the width that you want for your particular sash.


 This dress was so easy to do, since it only needed a few simple changes, and I saved a lot of money. It was a $5 dollar dress, buried in among all the other bland dresses thrown on the rack. And $5 dollars is pretty much all I spent on it, seeing that we already had some scrap material around for the sash, and we had the brown thread and the button that came with it. So if you like to sew your own clothes but it's so hard to do, and fabric is expensive, just go to any thrift store in your area where you know you can get good deals and have fun finding clothes that you can refashion. For inspiration you can look online to get an idea of what kinds of things you can do. And of course, you can always keep coming back here to A Valuable Season, where we plan on posting more of our refashioning projects.

Wednesday, January 28, 2015

Homemade Grape-Nuts


Crumbly, crunchy, and delectably sweet, this homemade version of Grape-Nuts will make a perfect addition to your breakfast menu. With a smidgen of patience and a little extra time, you can make your own cereal that tastes even better than store-bought! I heartily recommend this yummy recipe to anyone ready to try their hand at a unique and worth-while venture. My family loved them, and I'm sure yours will too!

Homemade Grape-Nuts (from the Thrifty Frugal Mom )

6 c. brown sugar
11 2/3 c. whole wheat flour
3/4 c. oil
3 c. sour cream or yogurt
1 tbsp. vanilla
1 tbsp. salt
1 tbsp. baking soda
2 c. buttermilk

Frugal Tips

- If you're looking for the healthier way, yogurt would be best. But I'm fairly certain that sour cream is generally cheaper than yogurt, so that's what I used.
-Our family doesn't usually have buttermilk on hand, so a homemade buttermilk recipe really comes in handy here. It sounds difficult, but all you have to do is add 1 Tablespoon of vinegar or lemon juice to every 1 cup of milk that the recipe calls for. Let it sit for 5 minutes and that's all. Easy!

Instructions

1. Preheat oven to 350 degrees.

2. Mix everything together except the buttermilk. Then gradually add the buttermilk. You will then    have a cookie-like dough.

3. Spread onto 3 greased cookie trays (If you don't have that many trays, you can use other pans, as long as they're large enough so that the batter cooks through).

4. Bake for 30 minutes and allow to cool (cut the large "cookies" into squares and flip over to cool faster).

5. Pulse the squares of batter until the whole batch resembles large crumbs.

6. Place them back on the trays and let dry in warm oven (200 to 225 degrees) for several hours. Stir occasionally. When done, the Grape-Nuts will be crunchy.

7. Enjoy your Homemade Grape-Nuts with a splash of milk, a handful of granola, or just plain!

My Notes

 I am so excited about learning how to make my own, homemade cereals! Bought at the store, breakfast cereal is so expensive, particularly the healthy kind, and in my opinion it doesn't compare to homemade cereal at all. Of course, in my opinion, anything homemade beats store-bought.=)
 This was my first cereal-making attempt that turned out wonderfully. Now, I must note that this recipe is very time-consuming. So before you dive right into it like I did, I suggest that you set a full day aside (not knowing how long it would take, I started making them mid-day and had to finish them the next morning)!
 I absolutely loved this recipe, particularly because it's a bulk recipe. The Grape-Nuts in the picture are only half of what the recipe actually made. I stored the rest of it in two freezer bags and froze them. So these last a long time.


Thursday, January 22, 2015

An Old Cake and A New

The next winter birthday is January 10th, Jeremy's birthday. After so many birthdays, it can be hard thinking of a good theme for a cake that hasn't already been done, and yet one that they will still enjoy. Of course, if the recipe is the same, they're sure to enjoy it no matter what it looks like.
 Jeremy's all-time favorite sport is football and he likes the Steeler's, but we already did a Steeler's cake the year before last (the Steeler's cake picture is in the first "cakes" post). Then last year, we did this humungous tower of sweetness.


  Who doesn't like Kit-Kats and M&M's? Not to mention, who doesn't like Kit-Kats and M&M's together on a double-layered cake with peanut butter icing?! Okay, some might think it sounds kind of gross (and it was rather sickening, so one tiny sliver was quite enough), but for anyone with a major sweet tooth, it's paradise.

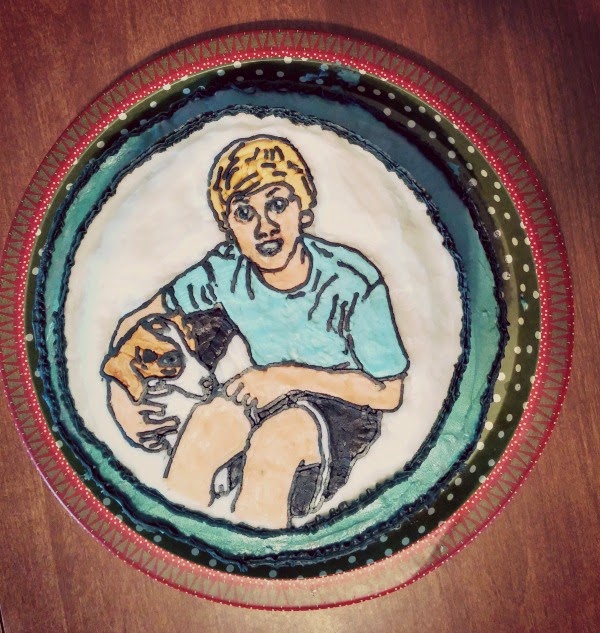
 So that was last year's cake. For this year, we decided we'd try to "trace" a picture we have of Jeremy and Molly (our beagle) together. I won't show the actual picture because the final image on the cake really doesn't look much like the original (but goodness, we used icing)! Obviously, we new it wouldn't be detailed, so Katlynn turned the picture into a drawing, by editing it at iPiccy.com, so we had a simplified version of the photo. Then we used our favorite technique to trace and transfer the finished product onto the top of the cake (our technique is explained here: http://avaluableseason.blogspot.com/2014/10/cakes.html). And...voilla!


Tuesday, January 13, 2015

My Two Enemies: Clutter and Disorganization

Clutter is one of my worst enemies. To me, there's nothing worse than a coffee table with no room for coffee among all the books and magazines piled sky-high,  a computer desk with an endless variation of letters, papers, CD's, and whatever else anyone might have put there for a "moment," and a kitchen counter covered with things that really could fit in that extra space in the cupboard. So as you might have guessed by now...I love, love, love to organize!
 Something I have to remind myself about organizing is that the entire house cannot be organized in one day. Once I start any kind of organization, I have difficulty focusing on just one project because it seems like it's all inter-connected (and it is, in a way). But that's how it works, just one bit at a time. So, here are a few of my projects I've completed lately.


 This is an idea that I got off of Pinterest that I thought was a great idea: each member of the family gets a box (clutter box, as I like to call it) for their own individual clutter. Then a certain someone (me of course =) goes around picking up all the clutter, which inevitably grows like weeds around here, putting each person's clutter in their box. Then the boxes should be emptied once in a while into each person's room. The advantages for such a system? Well, first of all, I won't get the run-down from anyone who lost something because I happened to put it away, since it will most likely be in their box where they'll find all their "missing" items. Secondly, it really does help keep any smooth, flat surfaces, such as coffee tables, desks, and kitchen counters, clear of clutter, of course not free of clutter. That will be the day when all tables and counters are forever free of clutter. But anyway, it really does help. Now, I know these aren't the prettiest looking organizers, but here's where my frugality comes into play. The picture on Pinterest showed four neat, perfectly matching baskets. And as we don't usually have four neat, perfectly matching baskets laying around, but a whole lot of boxes (from lots of online ordering) and plenty of yard sale fabrics, I threw these together one night. With a bit of hot glue, I wrapped the boxes in fabric, then used laminated index cards to label them. Now, there are six of us in the household, not four. But some of us share rooms, so I just made boxes for each of the rooms upstairs. Obviously, unless they were really long stairs, it would look rather crazy with six boxes all lined up! Anyway, as I said, they aren't the most gorgeous things you ever saw, but they get the job done.
                                                  

Yep, more fabric-covered "boxes." For these, I actually used those baskets that the mandarin oranges come in. As they aren't exactly decorative, I used more fabric as a cover-up. Again, not exactly beautiful, but helpful. They're hard to see in the picture, but they have labels: one for mail, one for church mail, and one for receipts. Not surprisingly, I usually still have to go through the mail sitting on the kitchen table. But, dad doesn't have the time, and I do...so it works. Not to mention I love sorting anyway!
                                                                             

Up next...kitchen cupboard clean up. I absolutely love using spices when I cook, lots and lots of spices. But it's almost unbearable when you're happily cooking along and suddenly become extremely aggravated because that one spice you need is lost among the gazillion containers that all look the same. So this was my project today. All together, I used  7 boxes/containers (I used up-cycled tea boxes, a coffee filter box, and basically anything I could find around the house) and then grouped all of the spices into categories. So for instance, the chili powder, garlic powder, onion powder, and curry powder all went in a box titled "Powders." All the seeds, like poppy seeds and fennel seeds, went in another, and so on. I can't even begin to imagine how much easier and stress-less cooking and baking will be from now on. And all it took was a pleasant hour or more of planning and sorting. What fun!
  

Jewelry Making

  One of my Christmas gifts this year was a gift card for my favorite store... MICHAELS! I Love Michaels. It's a crafts and arts paradise! I would love to have hours upon hours to just browse the whole store(though I'd probably end up spending too much money). There are many things I would love to buy at Michaels, but with my gift card, I bought only jewelry supplies. Before I went in I made up a list of the basic things I needed, so that I wouldn't be hours upon hours trying to figure out what to get. :) And even with my list it was overwhelming. A whole row of strung beads, in every color, in every shape and size. So many charms of so many things, in so many styles. And then the chain and the cording, and clasps and every kind of jewelry piece. Needless to say, I took a while longer than I thought I would. And after I had gotten everything I needed, I set to work on some new jewelry.
  I'm not really all that creative, so I usually have to find my ideas online, at least for inspiration. So these are all inspired from pictures online, but with my own bead choices, etc.
The first bracelet I wanted to make was made with some kind of leathery cording. But since I found a different cording for a little less money, I just improvised. I actually really like the way this one
turned out.

The hard part was finding beads that I liked that had holes big enough to fit the chord, and still not look bulky. I went around and around trying to find the right beads and then Laryssa came over, took a few minutes, and found the perfect beads for me. I had been thinking something with color, particularly blue or orange, but these beads look awesome! They gave the bracelet a more rustic look, and still had a small color variation. :) This was a really simple bracelet to make. Slide the beads on, tie the knots, and attach the clasps.
 Oh, and the little charm on the end. It was just a simple one I had on hand, and decided it would be a nice addition. So, great bracelet, and it goes well with most of my clothes. And if I want to I can make similar bracelets with different colored beads(if I can find any). :)
 Now for the next bracelet. I saw an idea for an ocean bracelet, with just a simple chain, sea charms, and large simple beads in ocean colors. I already had several sea charms, which I kept trying and failing to make a good bracelet with, so I decided to give it a try. My own bracelet didn't turn out as nice as I had hoped, but I like it better than any of my other attempts.
I found a pack of two chain bracelets already made and with my favorite kind of clasp, and since I already had other remains of chain I haven't used yet(but didn't want to use for this project), I went with this. I thought it wouldn't be too bad using a large chain, but looking at it now I think the chain is too big for the beads. I don't know, maybe it just needs more beads. But anyway, I do love the beads. It didn't take me very long to decide on these. They're blue(I almost always end up wearing blue), and they just look oceany! :) Definitely a summer bracelet, so I'll get to test it out then.
 And last of all I made a new necklace. I had been throwing around the idea of using a metal ring and dangling beads off of it, and I finally decided to give it a try.
I didn't use very many beads(it's a small ring), but I still think it looks neat. Something different. When I was picking out beads, I knew I wanted to use this kind. I just didn't know what color. I love green, and these beads all came in a pack together. I love the yellow and green combination, I just have to find something in my wardrobe that will match it. Again, this was super simple. The necklace I bought already made. It's so delicate and even the right length! So all I had to do was put the beads on, which actually wasn't that easy, come to think of it. Trying to get the loops on those head pins just right is difficult, but I made it work out in the end. So that's all for my latest jewelry making projects. You got something to read and I got some new jewelry to wear. :)

Sunday, December 21, 2014

"The Adventures of Daniel Shingler"

Well, it's December again, which begins the busiest time of the year for making cakes, since most of the birthdays in the family are in the winter. Starting with Daniel's in December, we make his, then Jeremy's and Mom's in January. After that comes Dad's in March, and then there's a long break until December again. The only summer birthdays are ours, and we don't normally work on those together.
 But now it's December, and our oldest brother, scholar, and future history professor turned 21 on December 14th. To celebrate, Katlynn and I made him a "book" cake. After much thought, we finally found a classic book title that we could squeeze his name into for a personal touch: "The Adventures of Daniel Shingler."

 This was a really enjoyable and different kind of cake to make, since it was the first time we actually had to carve one. It was fairly simple too. All we did was freeze the cake after it was out of the oven and cooled off. Then Katlynn (I left the scary work to her, which she bravely stepped up to=) gently carved out thin slices of cake in order to leave an indentation where the white pages would be. Then she used the knife to cut a narrow line on the top of the cake to make the book cover crease.
 For the icing colors, we usually use these sites to get ideas: http://sugarcraft.com/catalog/coloring/colormixingchart.htm & http://www.wilton.com/decorating/icing/icing-color-chart.cfm.
 The book cover is rust, and the lettering is semi-gold. I must say, the colors surprise me every single time we make a cake. Because as soon as we start mixing colors, it almost always seems like it isn't at all what we wanted. But it works out every time, whether it's the colors we planned on doing, or something else that still works.

Usually our cakes never turn out quite what we planned; we're always making changes and having to switch to Plan B. Nonetheless, we're usually satisfied with the results.
 Unfortunately with this one, we forgot to wipe up the splotches of brown icing on the pan before snapping the pictures. Not only that, but we probably need to find something else to put the cakes on now...it's painfully obvious that we used an upside-down pizza pan covered with foil. Huh...oh well.
 So there you go...Daniel's 21st Birthday cake...a success!


Sunday, December 14, 2014

Horse Lover's Dream


  I know you are all probably thinking about Christmas and expecting Christmas themed blog posts right now(and I promise you they are coming), but I just have to talk about horses. This weekend, Laryssa and I have had the privilege of taking care of two horses, owned by a man in our church. And oh, what a weekend! Coming home every day, with apple treats in my pockets, hay on my clothes, and the wonderful smell of horses on my hands! Now that may sound kind of crazy to some, but to horse lovers, it's the sign of a good day in the barn. And I am not normally an early riser, but dragging myself out of bed at 6:30, is totally worth it if I get to go be with the horses. We slip on our cowboy boots(or cowgirl boots I should say) and get out of the house while the morning is still dim and brisk, taking a pleasant early morning drive(despite the cold), with our hot coffee and tea in hand, and walk up to the barn to find two beautiful horses watching us approach, anxiously awaiting their breakfast. And then we get to do this again in the afternoon and again in the evening, spending almost the whole day with horses. It is a passion for us. Some people do sports, and some people do music, while maybe others do art, but we do horses. Working with them, playing with them, caring for them, and loving on them, it's the horse lovers dream.

                             * Photo credit goes to our wonderfully talented friend, Anna Grace. * 

Thursday, December 4, 2014

Homemade Rustic Ornaments

 After refraining from writing about my recent bout with clutter and its unavoidable frustration, I decided to turn to a more positive subject.
 It's Christmas time again and the tree was just put up last week. Last year's tree picking was definitely wait too late for my liking, so I was quite happy when we got it the Saturday after Thanksgiving this year. Much better.
 So here is our wonderful "country" Christmas tree, complete with homemade tree skirt made out of a burlap bag and other fabrics, homemade garland, and almost all homemade ornaments!


All three of us girls (that is, including mom) made the garland. It's really quite simple, but not at all a short project (it took several days to complete.) It's made of strips of fabric tied onto a long string of yarn. That's all. But believe it or not, its actually kind of fun to make...especially when your doing it with someone else!
 And then of course, there's the cute little, or should I say, cute and plump sheep. They were really easy to make too. All I used was a round piece of  quilt batting glued to cardboard along with black fabric for the face, ears, and legs. And of course red ribbon for the bow. Gotta love bows!


I was so excited to finally hang up the very first ornaments I made this fall...the Christmas trees. Lovely addition!
 
  So now that we have the Christmas tree up and trimmed, making the living room extra cozy at night (and even during my favorite time of day...early morning, when it's still dark), Christmas music playing all day long, and Christmas shopping officially starting...I'd say it's beginning to look a lot like Christmas!

Wednesday, December 3, 2014

Joy


A new category for our blog is Book Suggestions. We have wanted to do it from the start but never got around to it. So at last I'm going to suggest a book. The book is called "Joy: A Godly Woman's Adornment", written by Lydia Brownback. It's a small devotional that is a part of a four book collection called "A Godly Woman's Adornment". I haven't read the other books in the collection, but this one is great! It talks wholly about joy; Joy in Forgiveness, Joy in Abiding, Joy in the Present, etc. It was a great book for me since sometimes I get tired of living the regular day with it's repetitive routine, or just get wrapped up in the miseries of life. This devotional helped me(and still helps me)focus on the joy of day to day life, and the many joys that we have in Christ, despite hardships. So if you happen to be looking for a new devotional I would suggest this book, or any of the other three: Trust, Purity, and Contentment. It was really an encouragement for me, and I hope it will be for you too.

Sunday, November 16, 2014

A Hidden Beauty

I think one of the greatest struggles for women, is the temptation to be vain. We all want to look nice and there's nothing wrong with that, but the problem is that we make it our goal, our obsession. We can get so wrapped up in the way we look to ourselves and to other people that it becomes the only thing we ever think about. I struggle with this myself almost from day to day, fretting over the way my hair looks or the appearance of my clothes, etc. Now I'm not saying it's wrong to routinely put on makeup and fix up your hair or whatever. I'm just saying that I think we have other things to focus on. For instance, 1 Peter 3:4 says that our beauty should be "the hidden person of the heart with the imperishable beauty of a gentle and quiet spirit,..." Peter tells us in this passage that it's not the exterior beauty that counts, but the inside. What is a gentle and quiet spirit? To be honest I don't know exactly; it's not like I have all the answers. But I was thinking about this passage recently and what it means to have a gentle and quiet spirit. In the first two verses of chapter 3, Peter is giving a command to wives, "Likewise, wives, be subject to your own husbands, so that even if some do not obey the word, they may be won without a word by the conduct of their wives, when they see your respectful and pure conduct."(verses 1-2). Wives should be subject to their husbands and this especially helps in a marriage situation where a Christian woman is married to an unbeliever. Peter is saying that the husband may come to see the light through his wife's respectful character and pure conduct. So then when this continues in verse 3, "Do not let your adorning be external--the braiding of hair and the putting on of gold jewelry, or the clothing you wear--..."(verse 3), it seems to point us back to the previous verses talking about wives. "...But let your adorning be the hidden person of the heart with the imperishable beauty of a gentle and quiet spirit,..."(verse 4). So as well as being respectful and pure, wives should let the beauty of the hidden heart be the ultimate piece of adornment. And this also would be a testimony to an unbelieving husband, as well as a biblical life style for any wife. So a gentle and quiet spirit might be submissiveness, willingness, respect, pure conduct, etc., and Peter is saying that this is what a wife's adornment should look like. Now even though this passage is specifically talking to wives in relation to their husbands, that doesn't mean that women who are unmarried shouldn't learn from this. It's not like these qualities can only apply to married women. We think so much about what we look like on the outside, but what about other qualities such as a quiet and gentle spirit? Are we focusing on things like respect, willingness, and purity? Like I said before, I don't know exactly what it means to have a quiet and gentle spirit, but maybe it's all the things that make a Godly woman. And that, I believe, can be sought after through prayer and obedience to God.    
   Sometimes I start feeling down about the way I may look, or sometimes I'm just too wrapped up in my appearance. And on those days I turn to this passage, "but let your adorning be the hidden person of the heart with the imperishable beauty of a gentle and quiet spirit,..."(verse 4). And then the best part, "which in God's sight is very precious."(verse 4). Did you get that? It is VERY precious in God's sight. So much prettier than a particular hairstyle, and so much more beautiful than any pretty face. So who do we want to please: men, with the passing beauty of the external, or our heavenly Father with "...the imperishable beauty of a gentle and quiet spirit."