.post-body img { margin-left: -40px;}

Wednesday, September 30, 2015

Iron Skillet Corn Bread


My Discovery of Cast-Iron Skillet Potential


 I was told that food sticks to cast-iron skillets...badly.


 Did a google search: "how to use cast-iron skillets?"


 Found that they need to be properly seasoned with oil.


 Did that; followed instructions.


 Started cooking with the cast-iron skillet...


...nothing stuck... 


Became a cast-iron skillet fanatic.


Will now be using it for EVERYTHING!! 

~


Including cornbread! I've seen pictures of it baked in cast-iron skillets and loved how rustic it looked! The dark background of the skillet really makes the rich, yellow cornbread pop! Cast-iron skillets make basically any dish so much more vivid and presentable.


 So I had to try it myself.

 Now I know how I'll be making cornbread from now on...

 ...and how often. =)


Saturday, September 26, 2015

Ginger Sweet Potato Bean Soup & Ginger-Roasted Pumpkin Seeds


 The first day of autumn this year brought with it the inspiration of cooking "fall" foods. Cinnamon, ginger, nutmeg, cloves, is what comes to my mind. I didn't want to just make the boring old pumpkin pie, apple pie, and so on, even though they are really good. But I wanted to try something different. Something that actually wasn't a dessert.


  So what could be more appropriate than soup, on a breezy, autumn day. Ginger soup at that. I was trying to think of fall-like ingredients. There was a bag of yams laying around, so that was definitely a winner. I also had a lot of prepared white beans that I had soaked and rinsed, soaked and rinsed, soaked and rinsed, over the course of several days (I know that sounds excessive). So my end conclusion: Ginger Sweet Potato Bean Soup!


 Unfortunately, we didn't have any homemade bread on the day I made the soup, so I needed a side dish. We had some raw pumpkin seeds in the cupboard that I needed to roast at some point anyway. Thinking that the soup and seeds might as well "match," I sprinkled some ginger on them along with salt, pepper, and melted butter. The taste is fantastic, even with the unfortunate twinge of burnt taste (I don't know if it's because of the pan, the oven, or just my lack of skill, but I still manage to burn things fairly often).


 Anyway, by the time the soup was ready for dinner, I wasn't even hungry. The pumpkin seeds were just too good. =)


 Ginger Sweet Potato Bean Soup

olive oil

ground ginger

ground cloves

onions, chopped

garlic, minced

carrots, diced

chicken broth

yams

white beans

spinach

salt

pepper

Ginger-Roasted Pumpkin Seeds

raw pumpkin seeds

ginger

salt

pepper

butter, melted

Bake at 350 on a cookie sheet for 10-15 minutes. 


Monday, September 21, 2015

Making Creative Chalkboards


 Summer is almost over! I can't believe it's gone by so fast! And even more shocking is that I haven't posted anything all Summer! It has been a fairly busy Summer for me, but mostly I just haven't been doing a lot of post worthy things. So now I'm trying to pick up the slack and get back in the swing of blogging. :)

 To start it off I tried something I've always wanted to do. Paint with Chalkboard Paint! I had been wanting to give that a try in the worst way and I finally just broke down and did it(A Michael's gift card helped with that :) ). Now what I originally had planned for the Chalkboard Paint was something a bit bigger than this(which I'll share at a later time), but I need to prepare a few things for that project first, so today I'm showing you the smaller project.

 It was my mom's idea actually, so I can't take the credit for this. She had these old clipboards she was planning to get rid of when she happened to think that I could use them with my Chalkboard paint. What and excellent idea!


I sat outside to paint this cause the lighting for the pictures would be better. Plus it was a beautiful day. :)

The directions for the paint say that you need two coats. One you apply vertically and the other horizontally, with the space of an hour between each coat.


Second coat all done! After you've painted on both coats the paint needs to cure for 24 hours before use. Then...


 ...it's chalkboard time!


 Clipboard to chalkboard. Not a bad idea! :) Have fun coming up with your own creative ideas for chalkboards and share in the comments!

Sunday, September 13, 2015

Salad in a Jar


 Going to fairs and flea markets can be fun, and is something my family does at least once or twice a year. Nonetheless, I almost always go away with my stomach telling me I really shouldn't have eaten all that greasy, fried food. I'm sure you've all been there before. The steak sandwich and funnel cake sound great (although honestly, these don't even appeal to me anymore), and since there's not a whole lot of options that don't involve deep-fried, nutrition-starving fare, you go ahead and indulge.

 But gee, just imagine what a little bit of planning and smart thinking can achieve(and how much happier your stomach could be on the way home=). Who says you can't pack a lunch to the fair (or anywhere)? For that matter, who says you can't pack a yummy, nutrition-loaded salad?

 No one! Yeah, you might look a little funny eating salad at the fair, but it's worth it.

 I'm sure you've seen the salad jar buzz on Pinterest by now. I obviously have, and am glad I did. I love the idea of being able to make up a fresh salad ahead of time, and taking it anywhere I go.

 It's also a great way to use leftovers in the fridge! Here are some ideas to get you started:

-leftover corn or peas
-beans (of any kind)
-cooked pasta
-chopped veggies(of course)
-chicken or any meat
-walnuts, cashews, pecans, peanuts(my personal favorite)
 -oranges, strawberries, grapes(gotta love fruit)!

 All that's needed to assemble the salad is to:

1) Pour salad dressing on the bottom.

2) Add tender veggies like tomatoes and onions.

3) Add crisper veggies like broccoli and carrots.

4)Add any type of protein (cheese, meat, legumes).

5) Add any kind of leafy greens(really pack them in...you can fit a lot)!

 One of the reasons I love making salads is because it's so easy to make it look amazingly irresistible. Using bright, vibrant, and fresh vegetables and fruit in a salad make it almost effortlessly beautiful!

 So next time you make a trip to the fair or flea market, think ahead, pack a lunch, and enjoy the simple, healthy taste of homemade.


Monday, June 29, 2015

A Denim Tote


It's been a while since I wrote anything, but I assure you all it's not because I haven't been working on anything. I started making this tote weeks ago, and finally got it finished early last week. And I'm really excited about this project, because I made the whole thing out of a pair of jeans!! Well actually it took two pairs by the time it was all said and done, but that's no big deal.

 But before showing you all how I made this, I've gotta warn ya, it's not perfect. My sewing skills are somewhere between So-So and Down Right Awful! Not to mention I was plagued with sewing machine malfunctions(precisely why it took me weeks to finish). And if it wasn't for my moms helpful assistance, I don't think I ever would have finished it. But here it is at last, my denim tote.

From the very beginning I envisioned this tote as a beach bag to take to the ocean this year, so I wanted it to be as big as possible for carrying my things. I picked out a pair of large jeans from our yard sale that didn't fit any of the guys in my family and laid out my plans.


I needed to cut the legs to lay out flat, to give me two big pieces of material to work with.


So here I have my two pieces over top of each other.


However, they were terribly uneven with each other so I needed to cut some off of the sides to align them right. I also needed to cut off the original hem you see here on the jeans, which would make it really hard to sew.


The sides more evenly aligned, I could begin the sewing.


I flipped both pieces over to sew inside out, and pinned along the longest sides. I actually first pinned the whole thing right side out, then my mom mentioned that it would be wise to turn it inside out to sew. Oops! Yeah I forgot that part.


The sides sewn and the forming bag turned right side out again. At this point I was thinking "Whoa! This thing is way too long!" So I just cut a little bit more off the bottom. And notice that I left the hem on there that used to be the cuff of the pant legs. That is now going to be the top of my tote.


For sewing up the bottom, I turned the bag inside out again and rolled up the bottom edge, then sewed straight across.


Giving the bottom of the bag nice, well rounded corners.


Then for the top I wanted a cuff like a pair of jeans, so I folded the top down a bit and sewed above the original hem. When I finished sewing this I was like "Eeeek!" My line was anything but straight. Maybe if I keep on learning to sew I'll get better at that(hopefully).


Well then it came down to the straps. That's where I really started having problems. I couldn't do my original plan and the only alternative, I was afraid, would look too junky. But like I just said, it was the only alternative, so that's what I went with.

To make good, long straps I needed to cut into a second pair of jeans, since there wasn't enough left of the first pair to make them.


I cut out two long strips and folded the sides in, one over the other.


It was only after I had already sewn them that I realized I shouldn't have left the raw edge out to fray.


I sewed the ends straight onto the bag, which didn't turn out so good. This is really the only thing that I wish could have turned out better(besides the crooked lines of my stitches). But I had forgotten to fold in the raw edges on the ends before I sewed the straps, and after it was sewn there wasn't anything to do about it because if I tried to fold it in now it wold be waaaay too thick. But like my dear sister Laryssa said, "It's rustic." And it's just a beach bag, and I'm not one to start all over again just for a little more perfection.


From here my tote was pretty much finished. But as I was working on it, I had gotten the idea to sew on a pocket. So I grabbed the once pair of long jeans, now reduced to a pair of really short, frayed shorts, and slowly picked off the pocket. Needless to say, that really took a while.


And then, just to make it even longer and more tedious, I sewed it on by hand.


But despite the hassle, the pocket was a huge success and added the perfect touch to my simple, handmade denim tote.


And now I'm ready to hit the beach!


Although it may not be perfect, the thing I love the most about this bag is that I made it out of a pair of jeans(Okay two jeans). It was just so much fun pulling out an ordinary pair of pants and figuring out how I was going to take it and make it something new and useful to me. I've already got a ton of other ideas floating through my head right now(mostly from my pinterest board) and will be back again to share more of my crafty adventures!

Friday, May 29, 2015

Breakfast Fruit: 3 Easy Steps to Help your Family Love Fruit


 Morning is the best time of the day for me. And breakfast is the very best meal. So why don't I put more effort and time and thought into it, like I do for dinner? This is what I started asking myself after reading a post on meal planning (at this really awesome blog, Live Simply ). I mean, what could be better than waking up to a freshly prepared breakfast each lovely morning? Well, yeah, I'm the one that wakes up to prepare breakfast each morning. But I'm loving it. 

 In fact, you might say I'm getting a little too fond of breakfast preparation. I'm beginning to think the kitchen is all mine in the morning. That's always been an issue with me, actually. The kitchen needn't have anyone in it but me, while meal prep is happening. There's something a bit unnerving about having someone standing around and watching you during all that cutting and peeling, with juicy pulp and egg shells scattered across the counter (okay, I'm not always this messy, believe me), and with me running here and there throughout the kitchen for this, that, and the other. Anyway, all that to say, I like my privacy in the kitchen (and would love to have an actual dining room!) But all are more than welcome after everything is on the table and the counter is tidy and clean. =) 

 So, what's with the trays of fruit?

 Okay, I am what you may call a "fruitaholic." Fruit is my dessert. It's sweet, juicy, oh, so colorful, and wonderfully assorted. Now, there are certain members of the family who will eat it, but not extremely often and certainly not every day. So, would you believe me if I told you that I get bags stuffed full of all kinds of fruit, and that it barely lasts through the week?! I wouldn't have believed it myself. 

 But, after experimenting, I've acquired a few tricks to share with you, that will get your family eating much more fruit, much more often. Ready?


 1) Prepare, prepare, prepare. If no one is crazy about fruit, there's no way that they're going to bother washing the berries, peeling the oranges, cutting the pineapple, chopping the cantaloupe, or slicing the kiwi. It's just not going to happen. 

 So here is the second part of the secret.

 2) Make it look irresistible. Mixing and matching them and displaying them so the fruit actually looks appealing, is the best and easiest way to empty your fruit bowl, sitting lonely and neglected in the corner of your kitchen. If possible, use glassware to display your delectable gems. It does wonders to enhance their appearance. Also, choose a variety of colors. Don't put strawberries, grapefruit, and raspberries all on one tray. Rather, choose colors that will compliment each other. Believe me, it's an art.

 3) Mix it up. Make sure not to bore everyone with bananas and oranges every morning. Be creative. Try new things. One morning, we didn't have anything but watermelon, cantaloupe, and bananas. Normally, we wouldn't think of having melons for breakfast, but that's what we had. So I went right ahead and placed them on the tray alongside the bananas. And that was our breakfast tray for the morning. Hey, it works.


  If anyone tells you that fruit is boring, don't believe them. Fruit is fun, delicious, healthy, and full of  of potential.

 Is your family reluctant to eat fruit in the morning? Take a trip to the farmer's market, find some fresh, seasonal fruit, and prepare it, pretty it up, and mix and match. Next thing you know, the fruit will be gone before the pancakes! 


Monday, May 25, 2015

A Lovely White Bracelet


 I've been working on my jewelry lately, attempting to make new bracelets using different techniques. I'm especially interested in using different cording like suede and leather to make the more rustic, country kind of style I'm fond of. But since I'm not posting any of that right now you know I haven't had much success with it. I'm working on a bracelet right now that I finally put together, but then realized it was too big.


  However, I have had success with this lovely bracelet. I wasn't even planning this one, it just happened. I was looking around at Michaels, mostly in the jewelry section, and found a pack of metal connectors on sale. Yippee! So I bought them and created this bracelet. It's quite simple really but I have never done one like this before using connectors and eye pins. I have always used chain to make my bracelets, but this bracelet is a chain of connectors, eye pins, and jump rings.


 You can make a bracelet in the same simple way, of course, not exactly like mine since it isn't likely you'll find the same connectors that I used. But if you have a couple of connectors(like charms but with a loop on each end), beads, eye pins, jump rings, and a pair of clasps, you can make your own creations with this same technique.


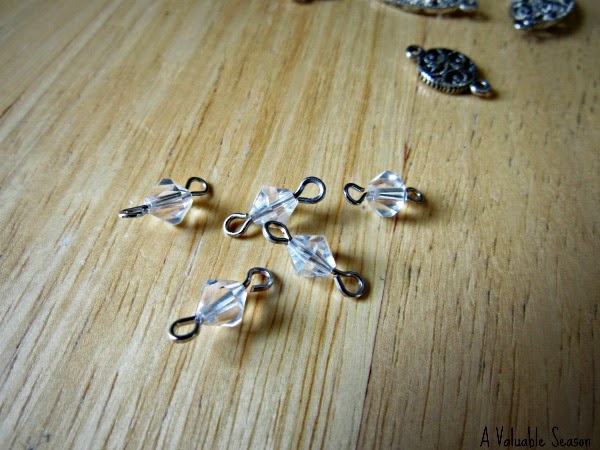
Eye pins can be a bit tricky until you get the hang of them. You slide your bead on and then cut the pin to the right length for making a loop of equal size to the one already made. If you need some help with this you can check out a tutorial here.


Depending on what kind of a bracelet you are making you can put different kinds of beads on the eye pin. I wanted a dressy one to wear with my dresses and such, so I used these white(or more like clear) crystal beads that made it look fancy and yet neutral so I could wear it with almost any color.


Here you can see all three of the pieces to the chain, a connector, a jump ring, and an eye pin with a bead. The rest was a piece of cake, connecting all of the pieces in order until I had the full bracelet, including the clasp.


 I love this pretty new bracelet. I even made one for Laryssa with the extra connectors that I had left over.

I would have liked to try it in the different colors I have, like dark purple, light blue, or light green, but the white is very lovely and goes well with almost everything, which is a definite plus. ;)